

Well, that’s all there is to installing Microsoft’s latest and greatest server-class operating system to a Proxmox VM.
In my opinion, deploying Server 2022 from Microsoft’s official VHD image is a lot easier than performing a vanilla installation from the ISO installation media. On paper (or screen!), there appear to be a lot of steps but honestly, it didn’t take me very long at all. Going forward, I’ll be using this method to deploy future instances of Windows Server 2022.
It would be nice if Microsoft provided a deployment image that was natively compatible with Proxmox but it’s quite understandable why they’re not inclined to do so, given that they have a competing product (Hyper-V).
With that said, it only takes a minute or two to convert and import the VHD for Proxmox use and you end up with an installation that’s been tweaked to run well in a virtualized environment.
As always, I’m more than open to any questions or comments so feel free to get in touch. Happy data-hoarding people!
Although Microsoft released Windows Server 2022 way back in the latter half of 2021, I still hadn’t tried it out until last week. The truth is, I’d not had a need to deploy any new Windows Server instances over the past year and I didn’t want the hassle of upgrading my older Windows Server 2019 instances to 2022.
A few days ago, I decided it was time to set up another file server and thought it was about time I gave Server 2022 a try. As my regular readers will know, I’m a big fan of Proxmox and use it to run most of my virtual machines.
I’m running the current version of Proxmox VE (7.2 at the time of writing) so didn’t anticipate any problems with running Server 2022 on top of it. There were no articles that I could find specifically around getting Server 2022 up and running on this hypervisor but that’s understandable with this version of the Microsoft OS still being quite new.
Microsoft offer Server 2022 in a couple of different formats (ISO and VHD). I’d decided to take the VHD route and actually found the process a little tricker than I’d anticipated. For this reason, I’ve decided to make a few notes and put them into this post. Hopefully, this will help “future me” and perhaps even some of my readers too.
In this tutorial, we will look at how to install Windows 11 on Proxmox.
The process to install Windows 11 on Proxmox is extremely similar to most other virtual machine installations on Proxmox. The main difference is setting up and configuring TPM, which we will walk through below. It’s always a good idea to ensure that Proxmox is up to date, which as of the writing of this article is v7.3-6. Also, please check out our tutorial on GPU passthrough if you’re interested in configuring that!
We will look at how to install Windows 11 on Proxmox below, but there are a few prerequisites that must be downloaded first.
After the ISO images above have been downloaded, move on to the next steps to learn how to install Windows 11 on Proxmox.
1. Select Create VM to create a new virtual machine.

2. Enter the VM ID and Name, then select Next.
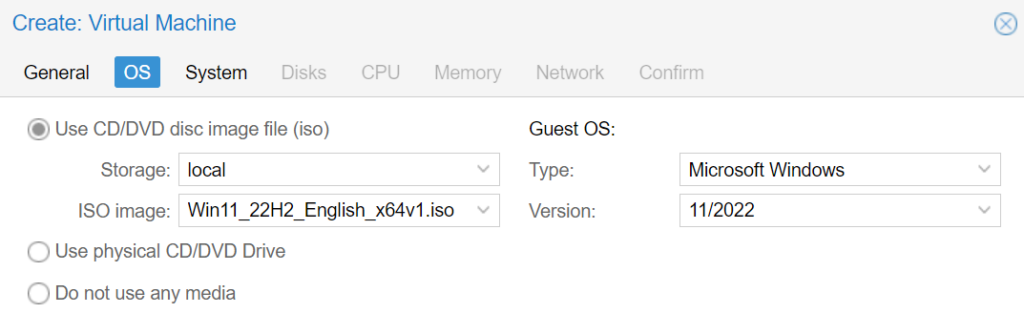
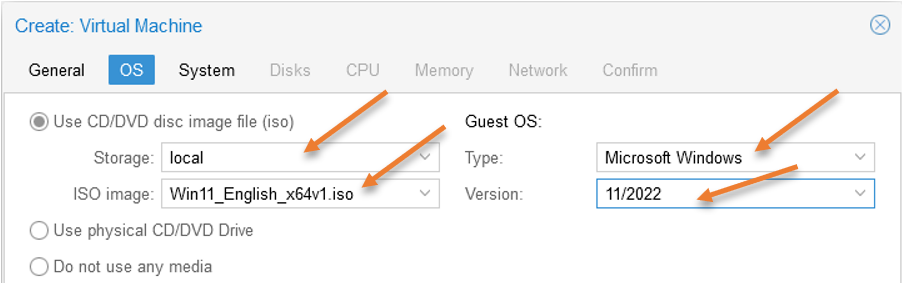
3. In the OS section, select the Windows 11 ISO image. Under Guest OS, make sure that Microsoft Windows and 11/2022 are selected. Then select Next.
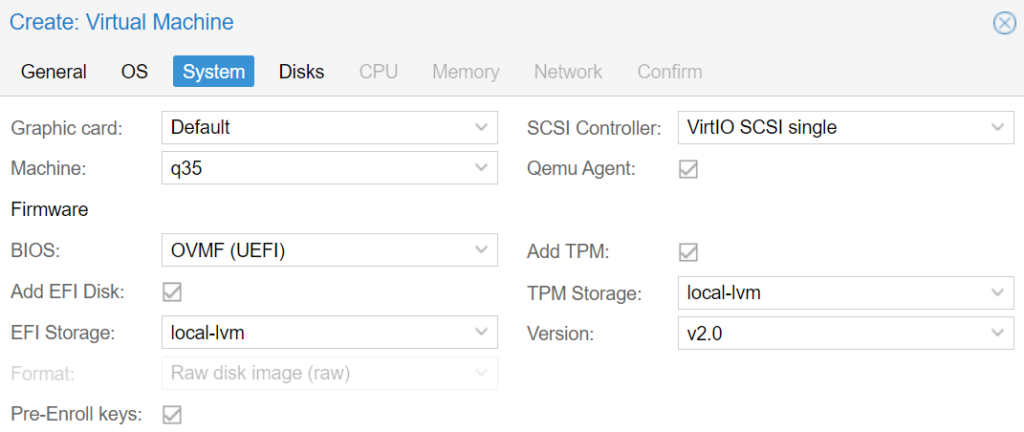
4. In the System section, the default values are generally fine, but there are a few changes we need to make. Select the same storage location for the TPM Storage and EFI Storage that you intend on using for the disk. Select QEMU Agent, then ensure that q35 and OVMF (UEFI) are selected.
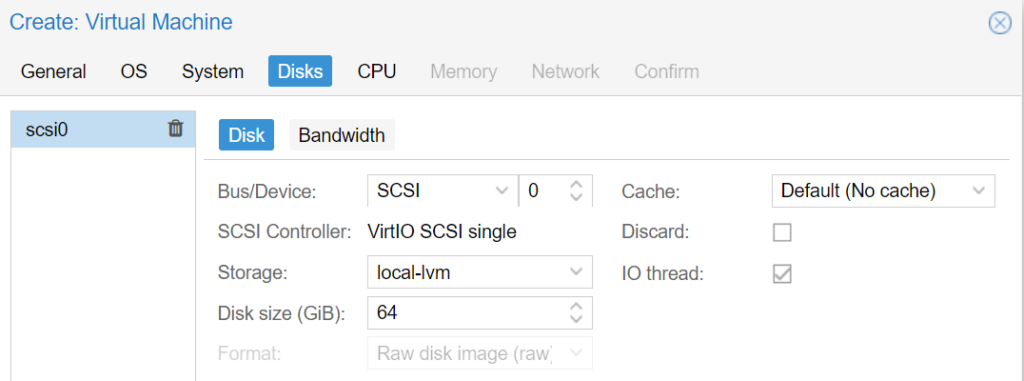
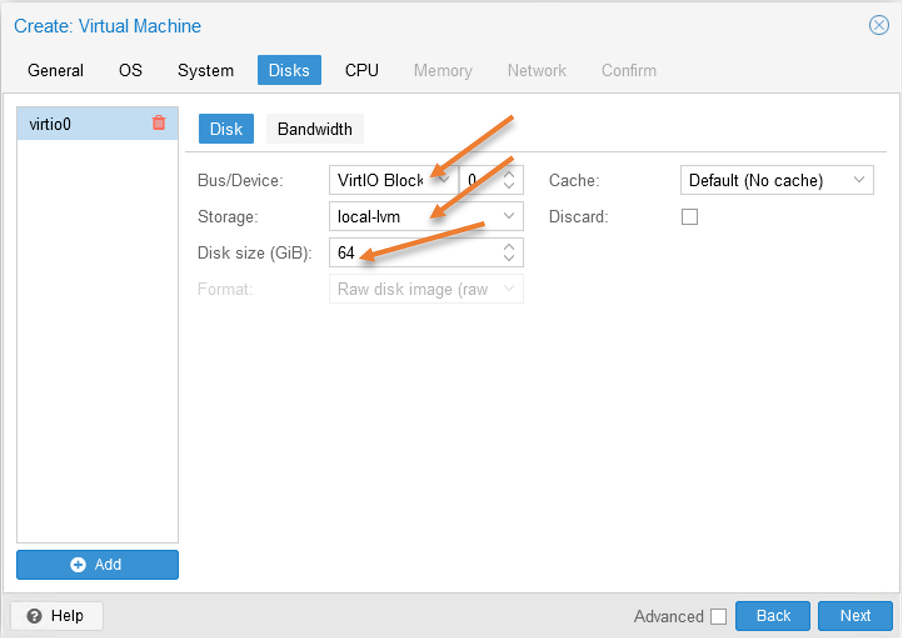
5. In the Disks section, select the storage type you’d like to use, then set the Disk Size as at least 64GB (this is the minimum Microsoft recommends for Windows 11).
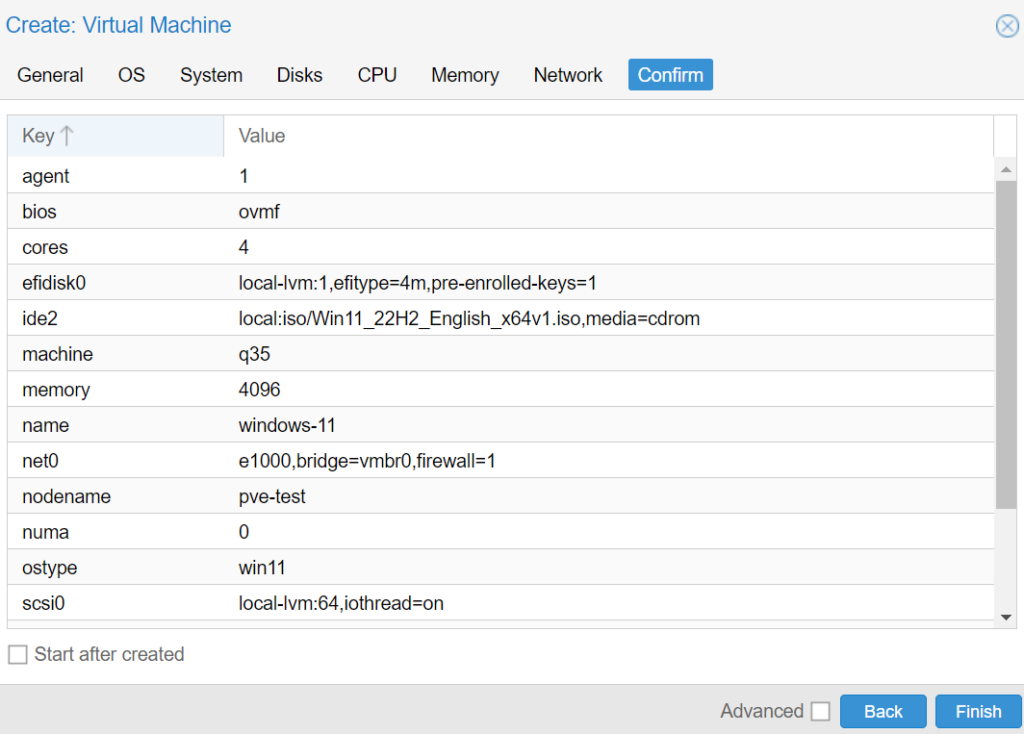
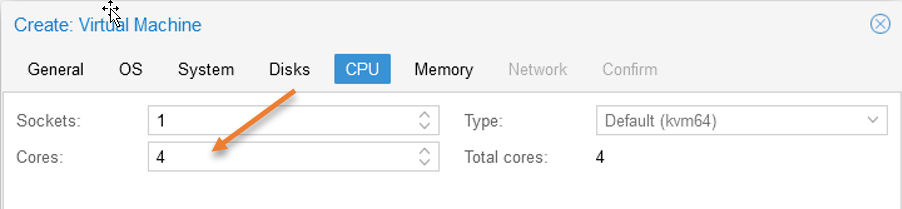
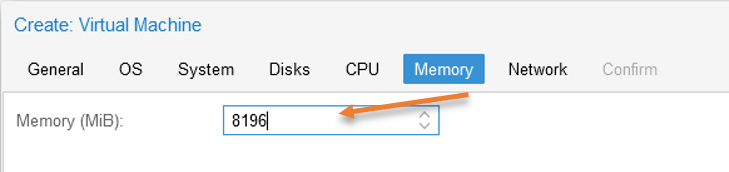
6. Set the CPU, Memory, and Network settings to whatever you’d like, then confirm the settings and select Finish. Make sure that the VM does not start after creation!
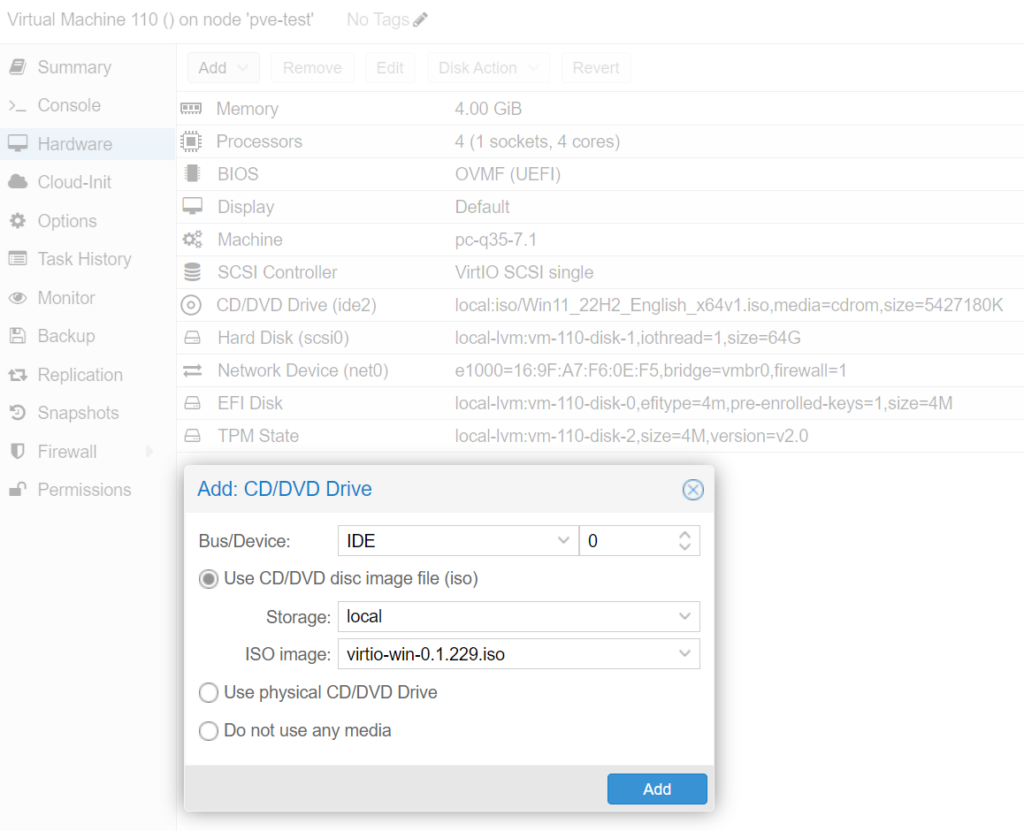
7. After the VM is created, select it, then select Hardware. Add a new CD/DVD Drive with the VirtIO Drivers downloaded earlier. After the drive has been added, Start the virtual machine!
- Installing Windows 11 on Proxmox
- Windows 11 Setup – How to Install Windows 11 on Proxmox
- VirtIO Driver Installation
- Does windows 11 support the Proxmox?
- Can I create a local account in Windows 11?
- Upload the windows 11 and Virtio iso images to Proxmox.
- Create the Windows 11 virtual machine.
- General.
- System.
- Virtual hard disk.
- Configure the CPU.
- Configure the memory.
- Choose the Network for windows 11.
- Attach the virtio drivers to the Proxmox for windows 11.
- Start the Windows 11 installation on Proxmox.
- Create the local account in Windows 11.
- Install the windows 11 dirvers.
- Install the QEMU/KVM guest agent on Windows 11.
- Introduction
- Tested Windows Versions
- Disclaimers
- What are VirtIO Drivers?
- Resources
- Slipstream VirtIO Drivers into Windows ISO
- Getting Wim Info
- (Situational) Remove Unused Indexes
- (Situational) Convert. esd to. wim
- Per Index Steps
- Mount an Image
- Inject/Slipstream Drivers
- Verify Drivers Have Been Added
- Final One Time Steps (per ISO)
- Copy Updated. wim Files Back to ISO Folder
- Rebuild Windows ISO
- Post Install Using the New ISO
- Install QEMU Guest Agent
- Enable the Balloon Service
- Reboot the VM
- Conclusion
- Completing the installation of Windows Server 2022
- Step 1 – Power on the Server 2022 VM
- Step 2 – Launch the console
- Step 3 – Provide regional settings
- Step 4 – Review and accept Microsoft’s license terms
- Step 6 – Logon to Windows Server 2022
- Step 7 – Installing the VirtIO drivers and guest tools/agents
- Attaching the imported disk
- Importing the disk image into the VM
- Downloading the VHD or ISO directly to the Proxmox host
- Creating a new VM ready for Windows Server 2022
- Choosing between Windows Server 2022 ISO and VHD
- Changing the Proxmox VM’s boot order
- Converting the VHD for use in Proxmox
- Enabling the QEMU guest agent and SPICE agent features
- Step 1 – Shutdown the Server 2022 VM
- Step 4 – Change the display to “SPICE”
Installing Windows 11 on Proxmox
Now that Proxmox has been configured, we will run through the steps on how to install Windows 11 on Proxmox. The key is ensuring that the correct drivers are utilized during the installation.
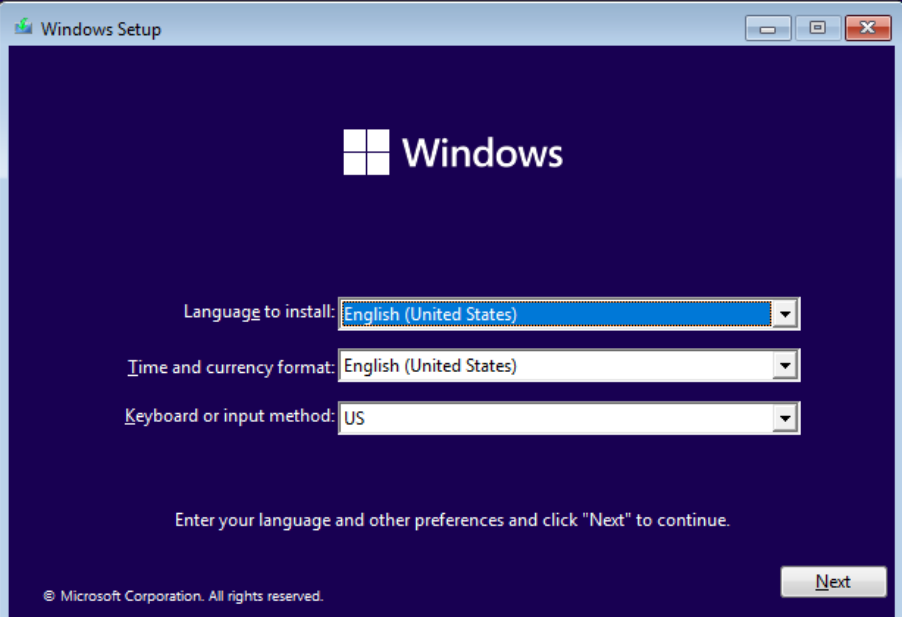
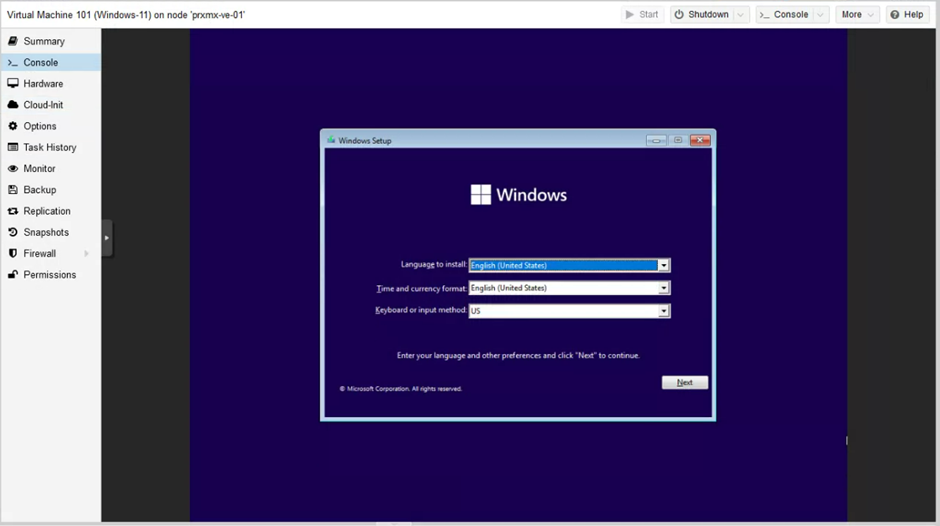
1. Boot up the VM and access the Windows Setup (you might have to press a key to boot into the Windows installation when first starting the virtual machine). Select the correct settings, then select Next.
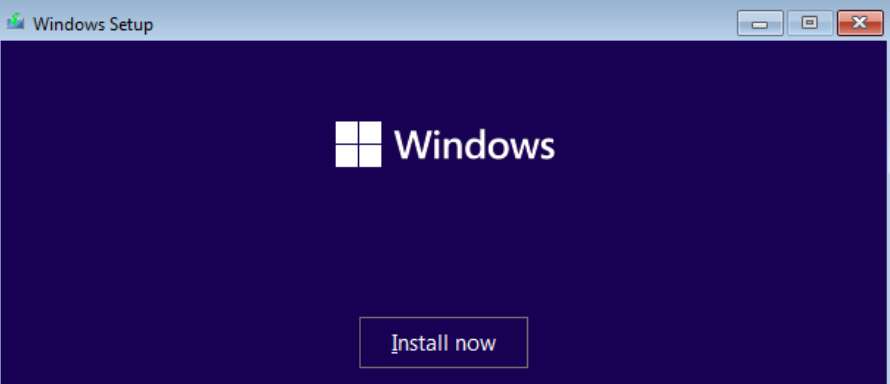
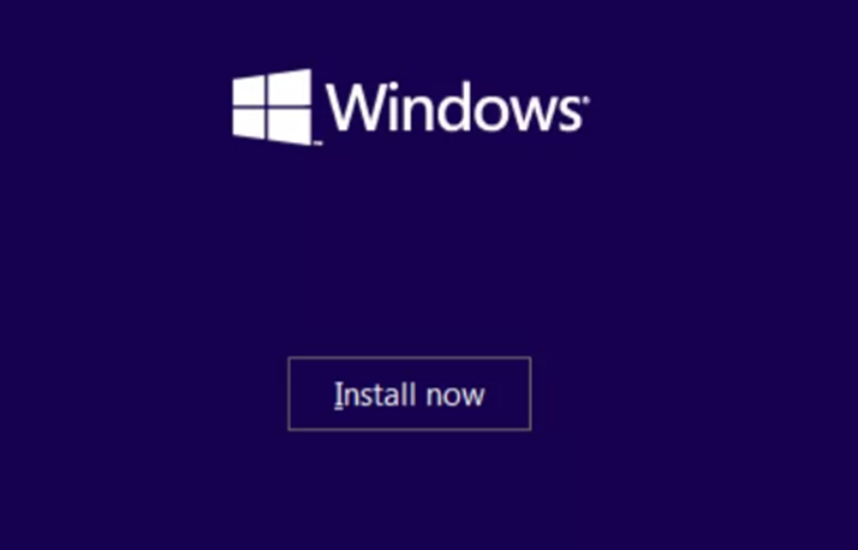
2. Select Install Now and the installation will begin.
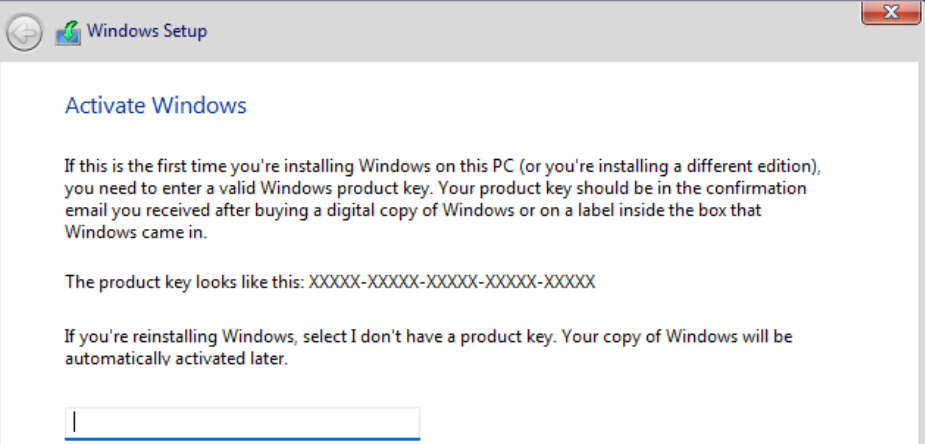
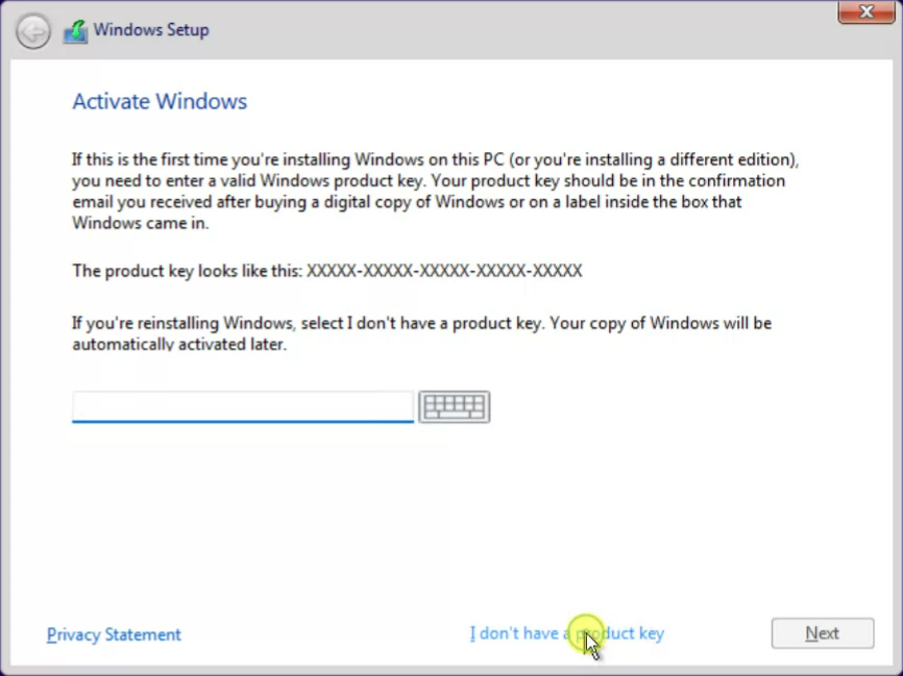
3. Add a Product Key if you have one, or select I don’t have a product key.
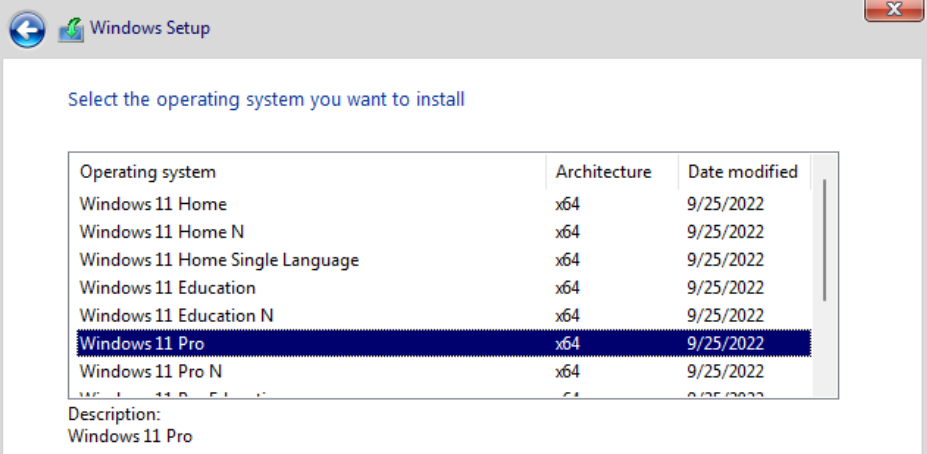
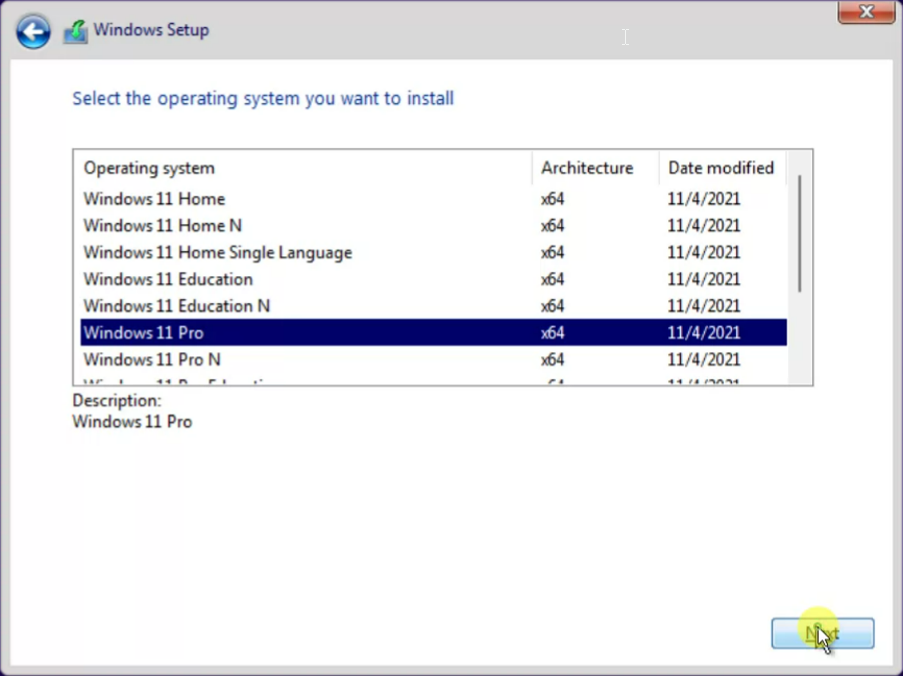
4. Select the version of Windows 11 you’d like to install, then select Next.
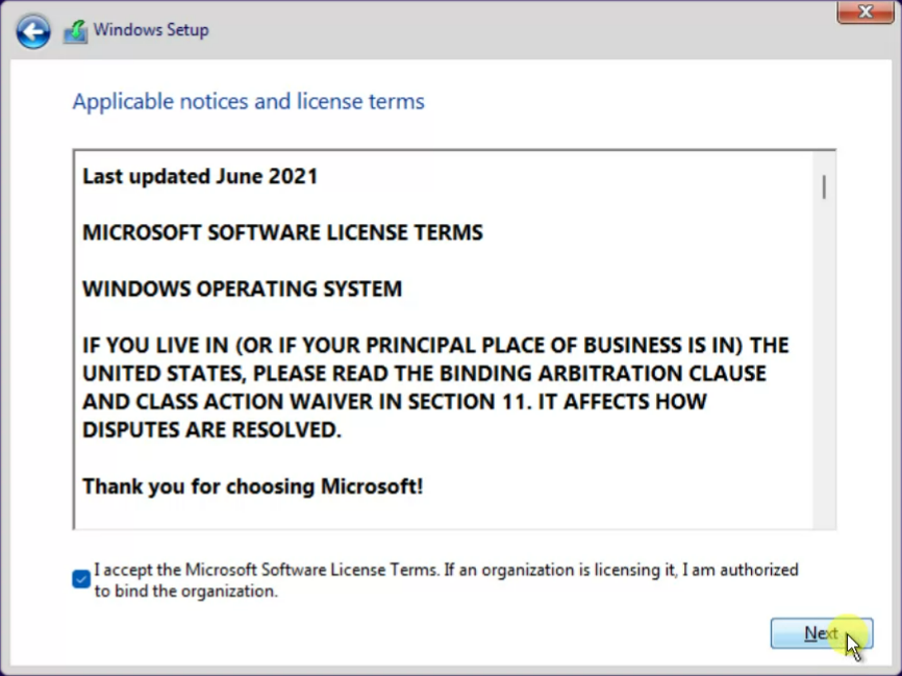
5. Accept the terms (if you agree with them), then select Next.

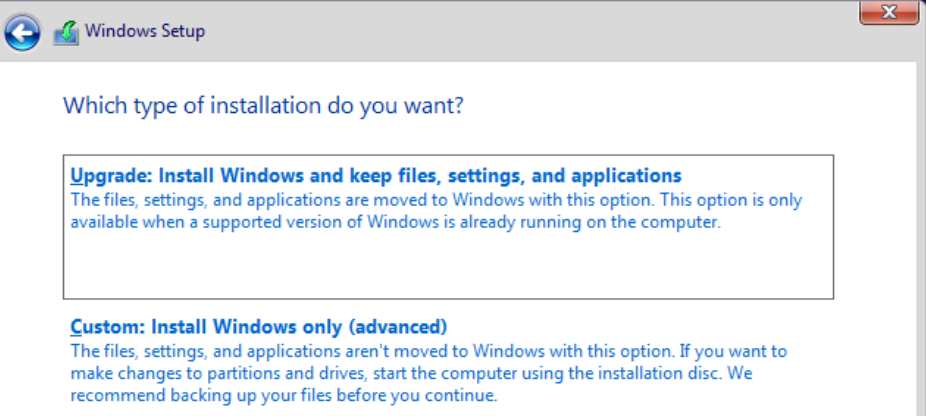
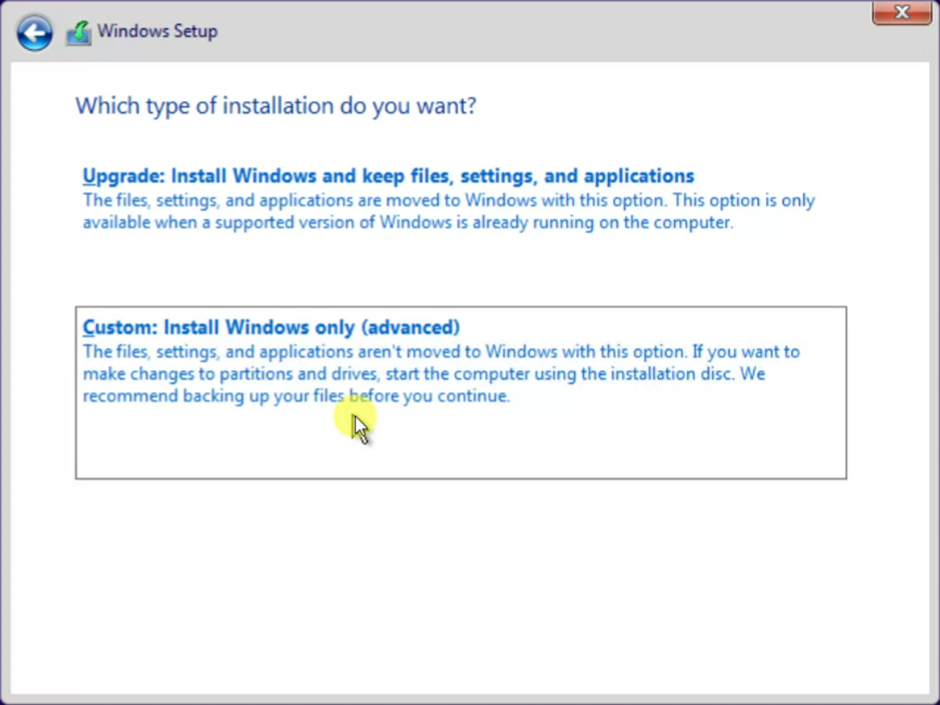
6. Select Custom as we will have to install the correct drivers before proceeding.
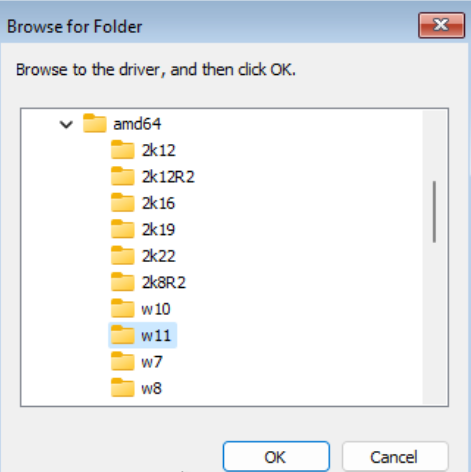
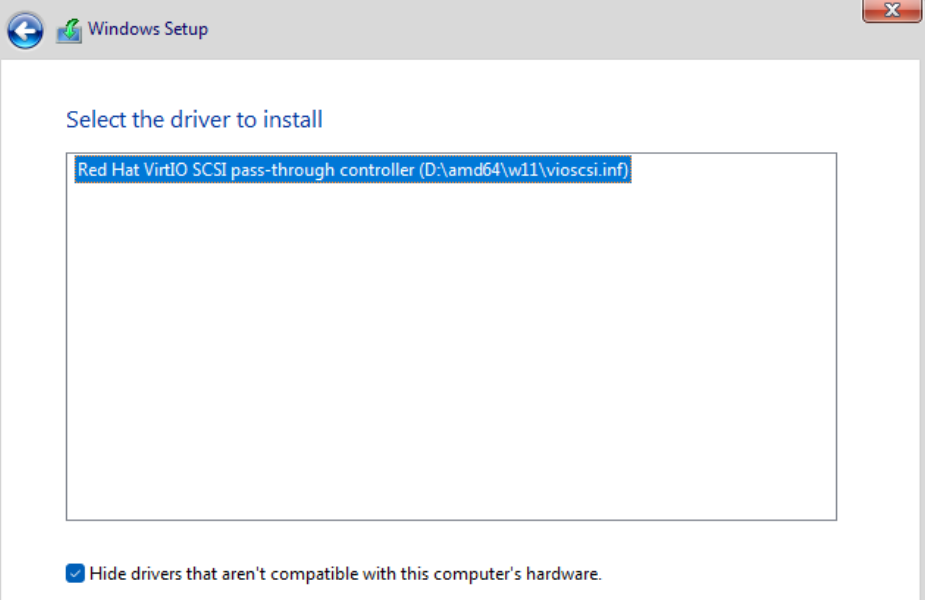
7. The drivers will not be installed by default meaning that the Install Windows screen below will initially be blank. To install the drivers, select Load Driver, browse to the VirtIO disk, select amd64, then w11, and finally, OK.
8. Windows should find the correct Driver. If it did, select Next to install it.
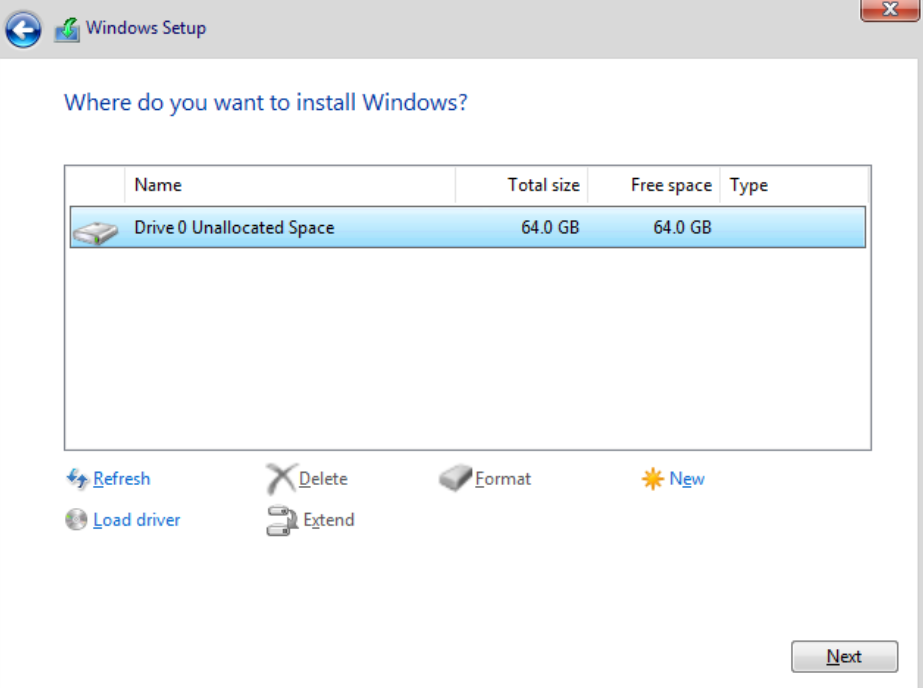
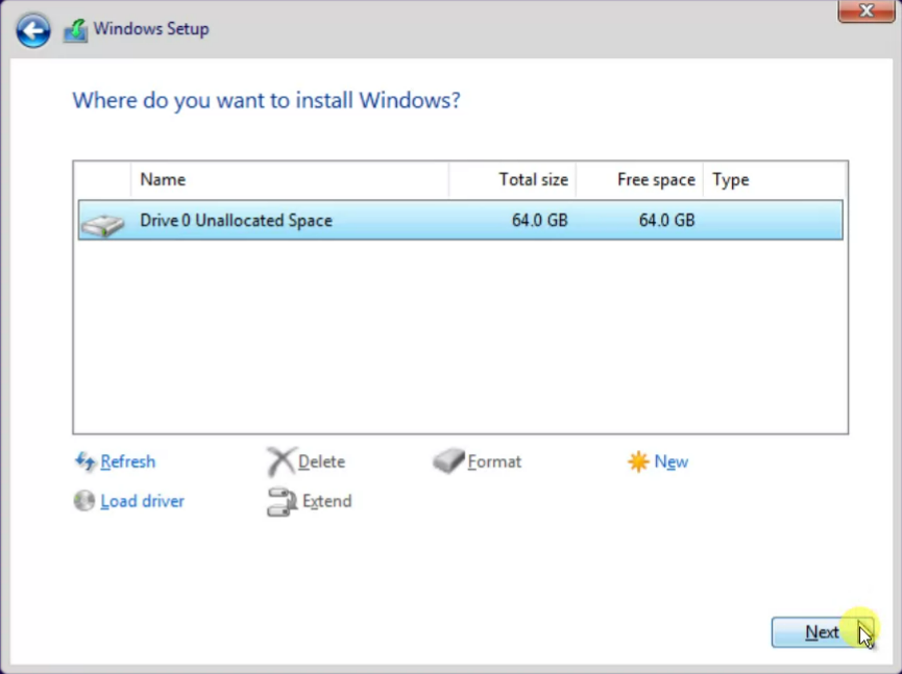
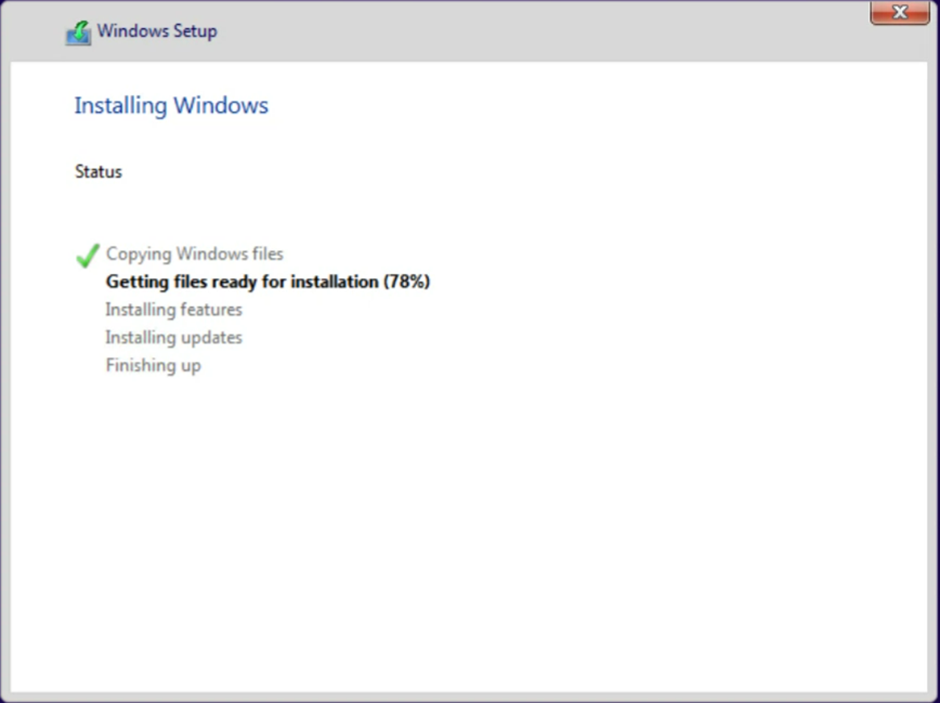
9. After it’s installed, you’ll see the hard drive selected. You can now proceed and Windows will install! After the installation, the VM will reboot.
Windows 11 Setup – How to Install Windows 11 on Proxmox
Now that Windows 11 is installed, the final step is to configure it. I am not going to provide screenshots for this as it’s a basic Windows 11 configuration.
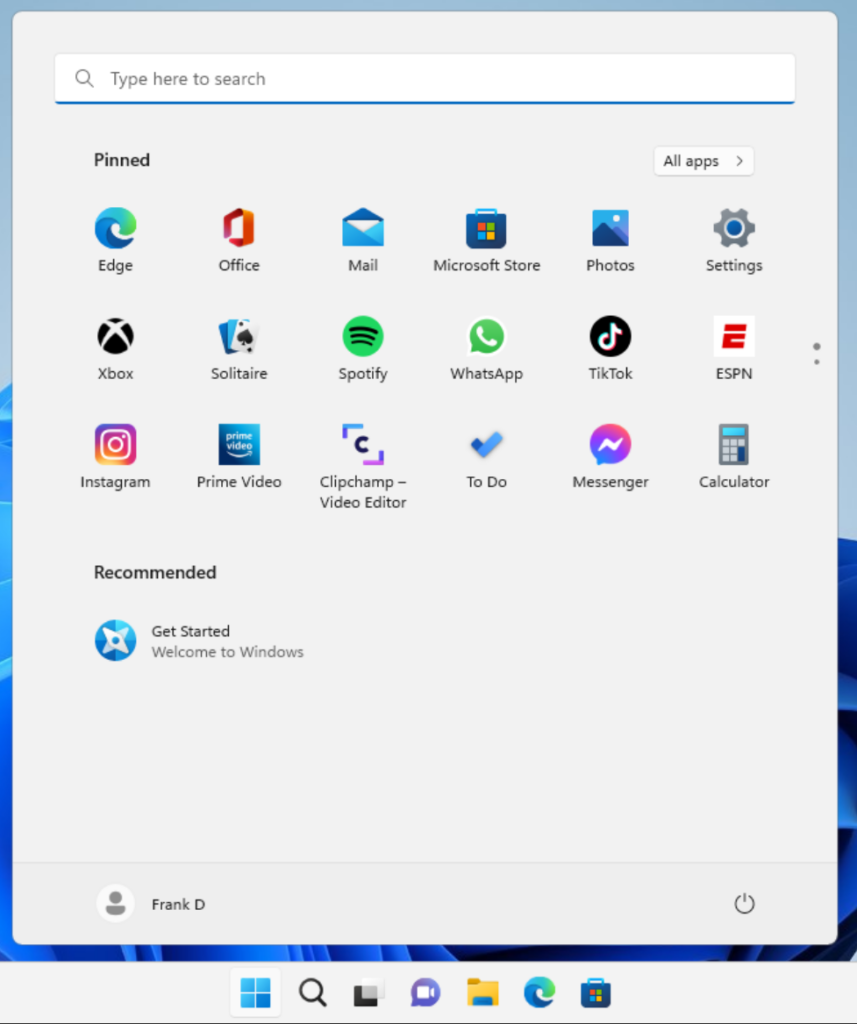
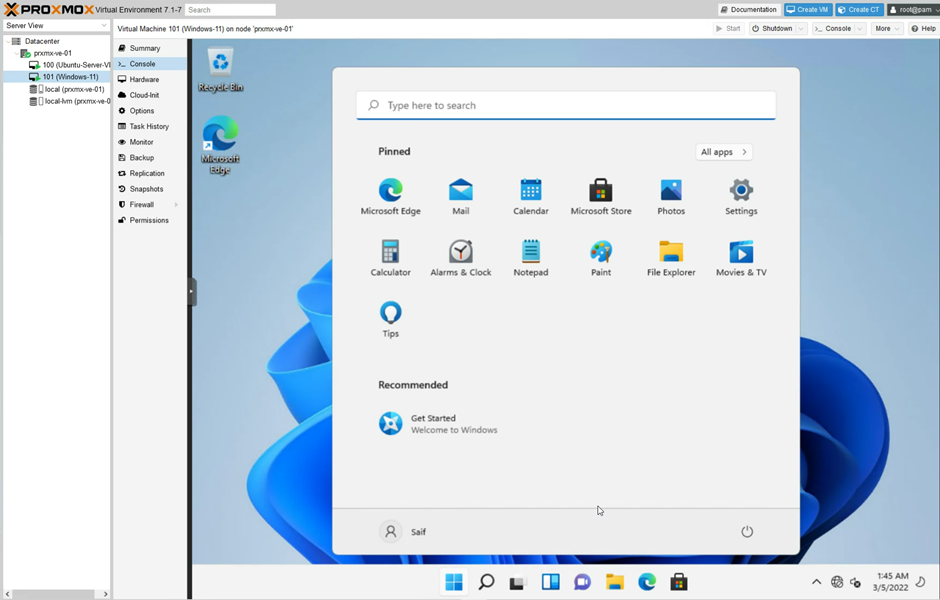
Finally, Windows will search for updates, then get the system ready. When complete, you’ll see the Windows 11 desktop!
If you open the Device Manager, you will notice that a few drivers must be installed, so that’s the final step.

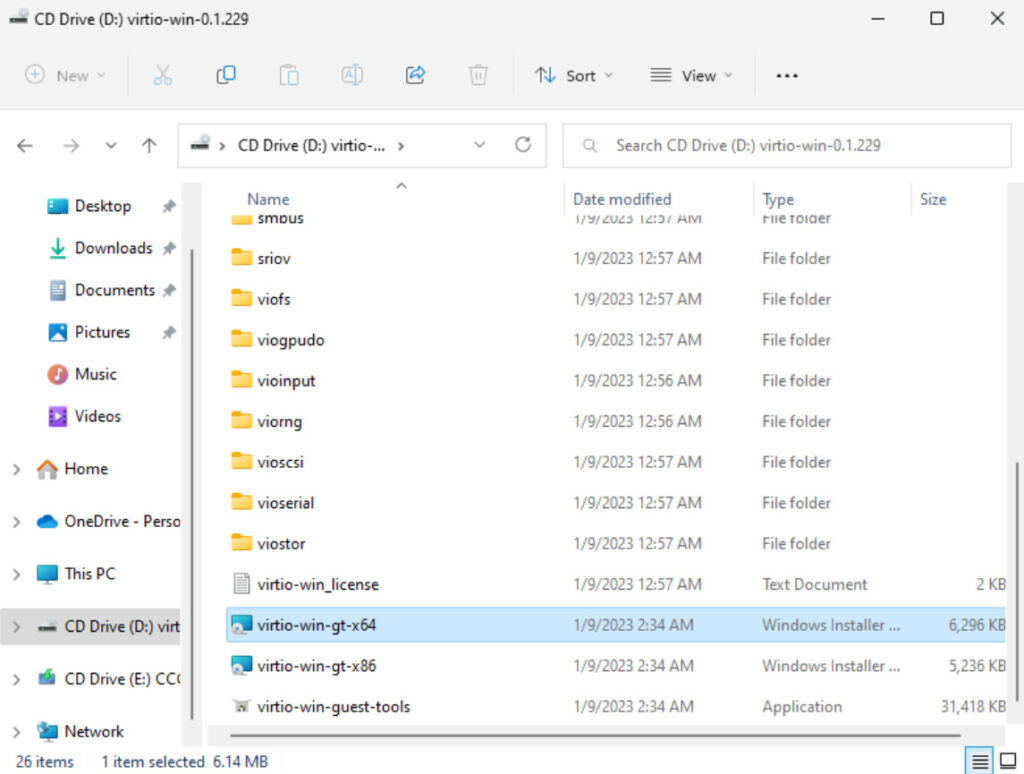
VirtIO Driver Installation
1. Open the VirtIO CD Drive (it should still be mounted). Double-Click the virtio-win-gt-x64.msi file to run the installer.
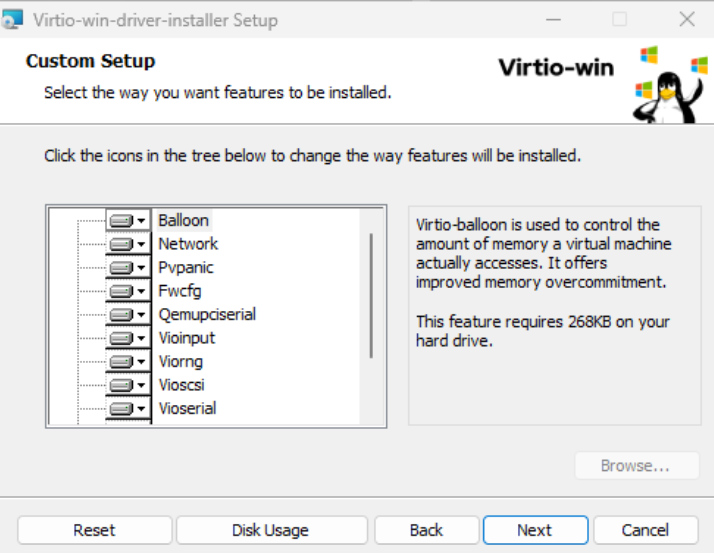
2. Run the installer, ensure that everything is selected, then select Next to install the drivers.
3. After the installation is complete, all drivers should be successfully installed and Windows 11 should be fully functional!
Our last blog post covered the installation of windows 11 on the KVM hypervisor, and it works well. In this blog, we will look at the installation of windows11 on the Proxmox server. The Proxmox server is based on KVM itself.
Does windows 11 support the Proxmox?
Windows 11 is the latest client operating system from Microsoft. The only thing to keep in mind is that unlike Windows 10, Windows 11 requires more hardware recommendations, including TPM and secure boot. Without this, you will end up getting an error message on the Proxmox installation screen that says this PC can’t run window11. So to install windows 11 on Proxmox successfully, there are two ways. You can enable the TPM and secure-boot on the Proxmox server, or you can entirely bypass it so it will never check the minimum requirement during the windows 11 installation. After the successful installation of Windows 11, you can access the virtual machine without any issues and it works fine in Proxmox.
Can I create a local account in Windows 11?
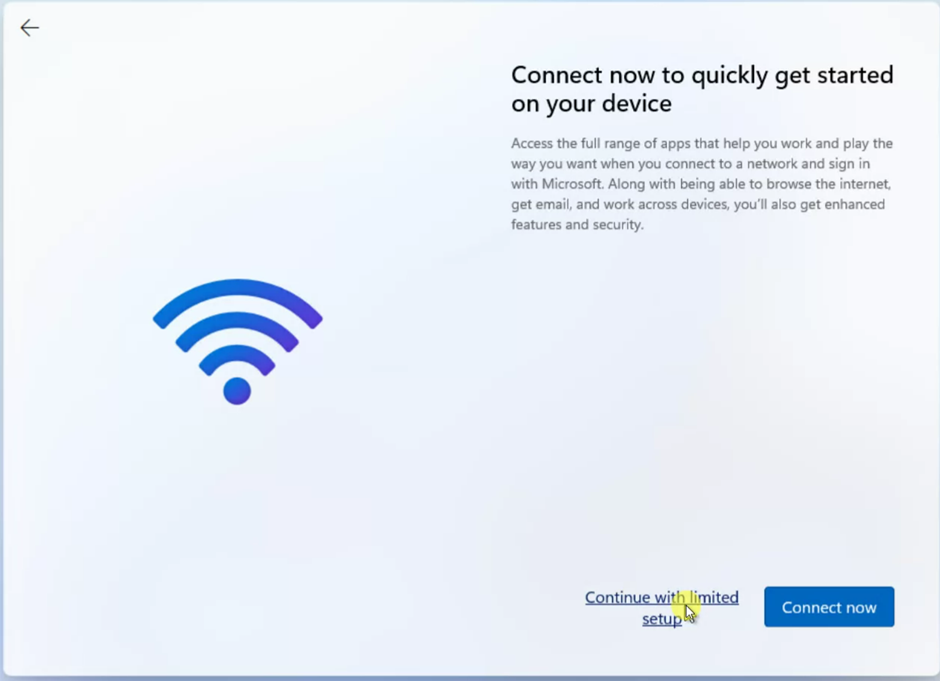
You can create a local account in Windows 11 editions except for home. During the setup, you need to ensure no internet connectivity for the windows 11 virtual machine. So windows 11 will redirect you to choose a limited setup, and then you can create a local account and start using it.
I will connect the network adapter to the Windows 11 VM setup. Still, there is no DHCP server configured for Proxmox, which means even though I have network connectivity, there is no Ip address assigned to the windows 11 machine. As a result, I will not have internet access, which will help me to set up the local account in Windows 11.
So if you have DHCP configured in your Network, you may not connect the network adapter during the virtual machine installation.
Before you begin,
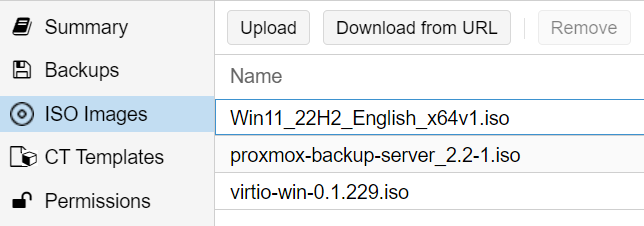
Upload the windows 11 and Virtio iso images to Proxmox.
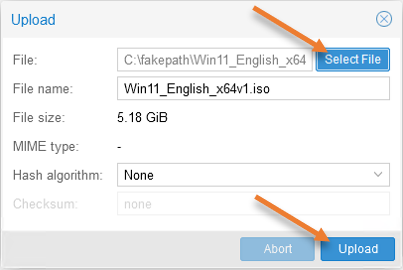
We have already downloaded the Windows 11 iso image from Microsoft. Let’s go ahead and upload it to Proxmox.
In the new upload window, choose the ISO image you downloaded by clicking ‘select file’ to browse and clicking on Upload.
The Upload will take some time, depending on where you upload the file. If it is within the same LAN network, it will be faster.
Like the windows 11 iso upload, you have to upload the virtio iso file to the Proxmox.
I will use the Download from URL option, click on that, and paste the URL in the URL.
And click on Query URL, and you may click on Download.
The Download will take time, depending on your internet speed.

Create the Windows 11 virtual machine.
To create the windows 11 virtual machine, click on Create VM.
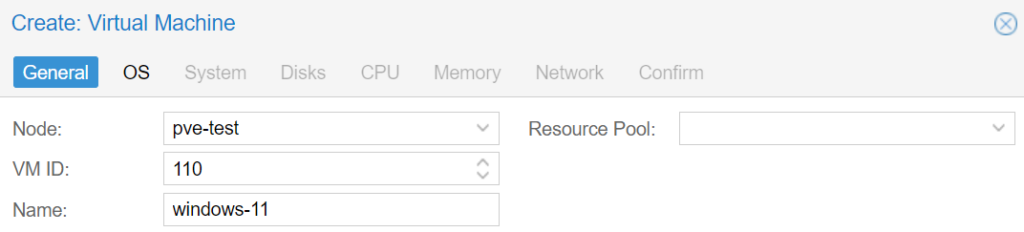
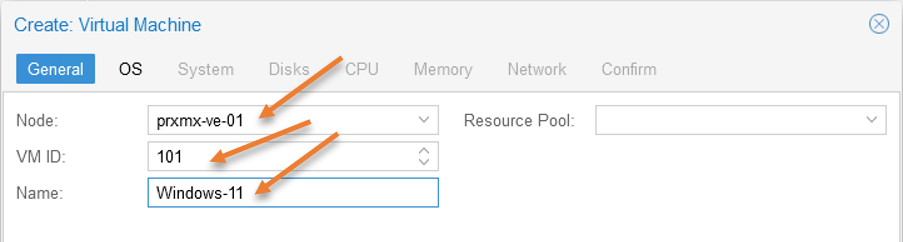
General.
Node: Since I have only a single node, it has been chosen that. If you have multiple nodes, you will have to select the correct server where you will install the Windows 11 virtual machine.
Click on Next.
In the OS configuration, you need to choose the storage as Local, and in the ISO image, you will have to point to the Windows 11 ISO image that we uploaded in Step1.
Type: Choose Microsoft Windows. Version: 11/2022 –The latest version for windows 11.
System.

Virtual hard disk.
Storage: This is where you would save the virtual hard disk. Choose the same local-lvm storage.
Disk Size: Proxmox assigned 32GB, which is not enough. Hence I have chosen 80GB, more than the Microsoft recommended size 64.
If you are using SSD storage, you might as well check the Discard option. I am not checking that for now.
Configure the CPU.
Microsoft recommends at least 2 CPUs, and we are going to give 4 CPU total, and click on Next.
Configure the memory.
In the Memory configuration, it has taken 2GB of RAM, which is not enough for the windows 11 operating system to function, you should give at least 4GB of RAM. I am giving 8GB of RAM which is good for the windows 11 virtual machine.
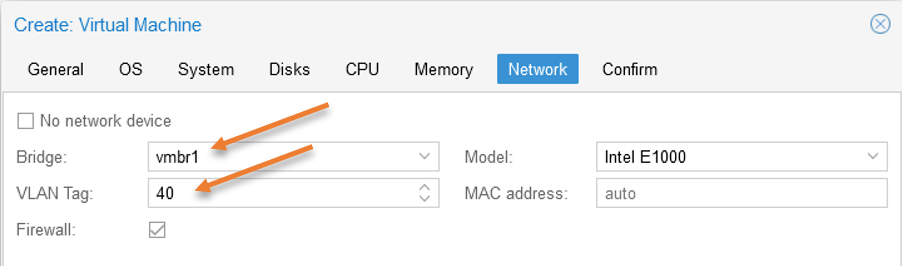
Choose the Network for windows 11.
I have two Networks, vmbr0 is for the Proxmox management, and vmbr1 is for the VM network. Hence I have chosen vmbr1 for the bridge.
VLAN Tag: My Network is configured with a VLAN tag of 40, hence add that. If you are not using the VLAN tag in your environment, you may leave this blank.
Leave the firewall option checked.
Model: Choose the default E1000 for the intel adapter.
That’s it and click on Next.
Note: If you are planning to use a local account in windows 11, you can choose No network device, which will disable the network connectivity for the VM and help you create the local account.
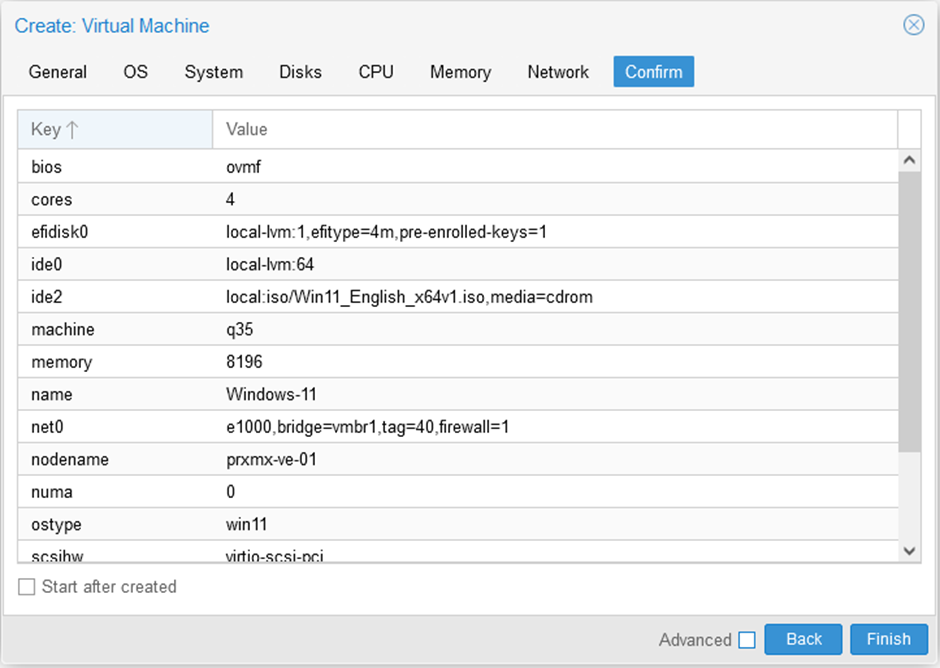
Eventually, you will get the summary of the configuration that you have made thus far, go through the configuration and make sure everything looks good. You need to ensure that the Start after created option is unchecked. As there are a few more things to do before proceeding with the windows 11 virtual machine installation in Proxmox.
Click on finish.
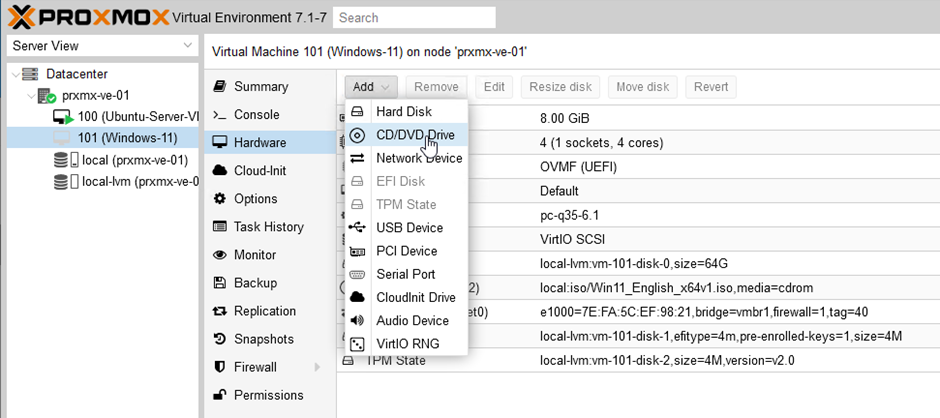
Attach the virtio drivers to the Proxmox for windows 11.
We have just deployed windows 11 in Proxmox, and before we proceed with the installation, you need to add VIRTIO Qemu drivers to make the Windows communicate with the Proxmox, which is based on Linux.
Select the newly created windows 11 virtual machine.
Click on Hardware, and click on Add CD/DVD drive.
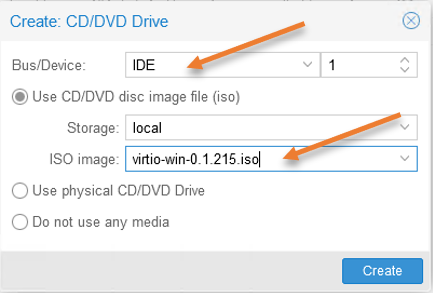
Leave the Bus/Devce to IDE.
Choose Use CD/DVD image file (iso)
ISO image: Choose the virtio ios image that you added earlier.
Start the Windows 11 installation on Proxmox.
We have configured the windows 11 virtual machine in Proxmox let’s go ahead and install the operating system.
Select the Windows 11 operating system and click on console on Proxmox and click on Start.
After a few seconds, you will have a proxmox screen and the windows 11 installation will now begin.
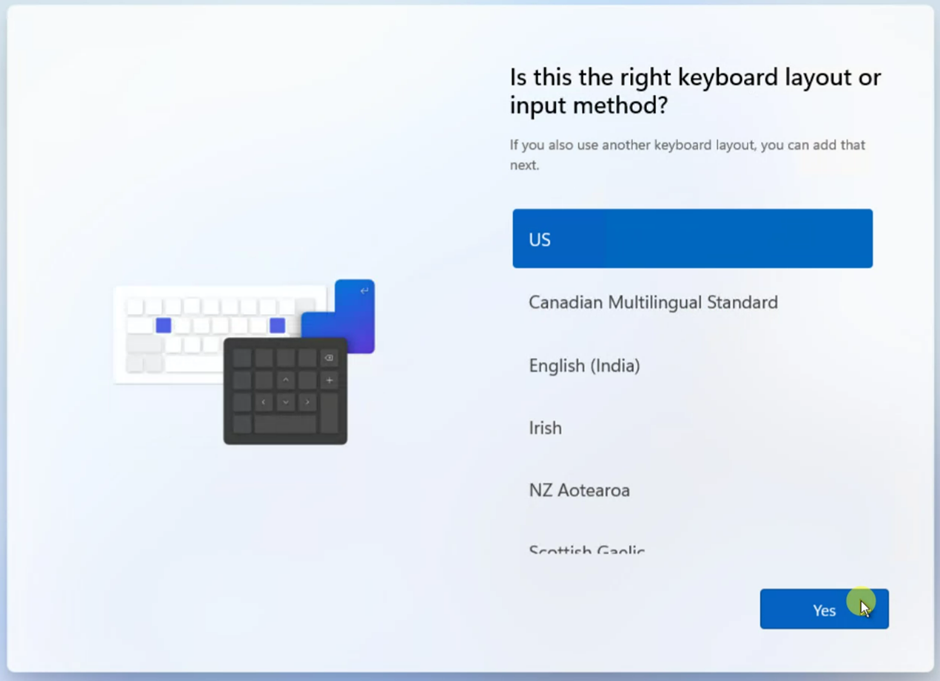
Choose the language and the keyboard layout of your choice and click on next.
After that click on install now.
Since it is a vm, you most likely will not have license, hence choose I don’t have product key.
Choose the Windows 11 edition that you would like to install and click on next.
Accpe the license agreement, and click on next.
Choose custom installation.
You will get the virtual hard disk that we defined in the Proxmox server, choose that and click on next.
The installation will now begin, and it will take some time for it to finish.
After the installation, you will get the windows initial setup wizard, choose the region, and click next.
Create the local account in Windows 11.
Since I don’t have internet, I clicked on Continue with a limited setup which would help me to set up my local account instead of a Microsoft one.
Install the windows 11 dirvers.
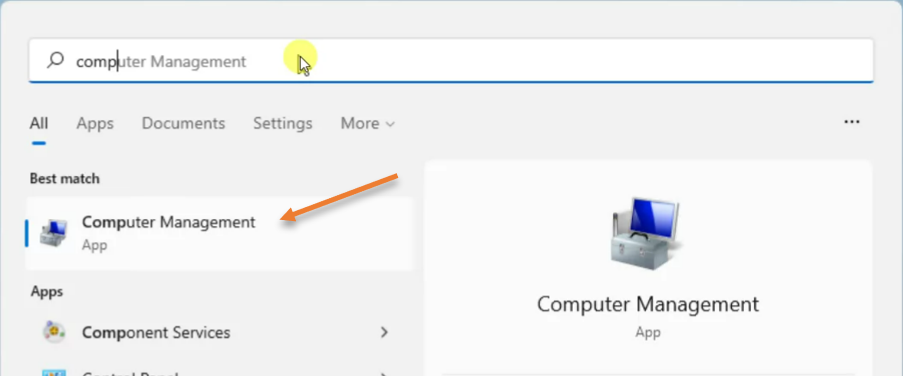
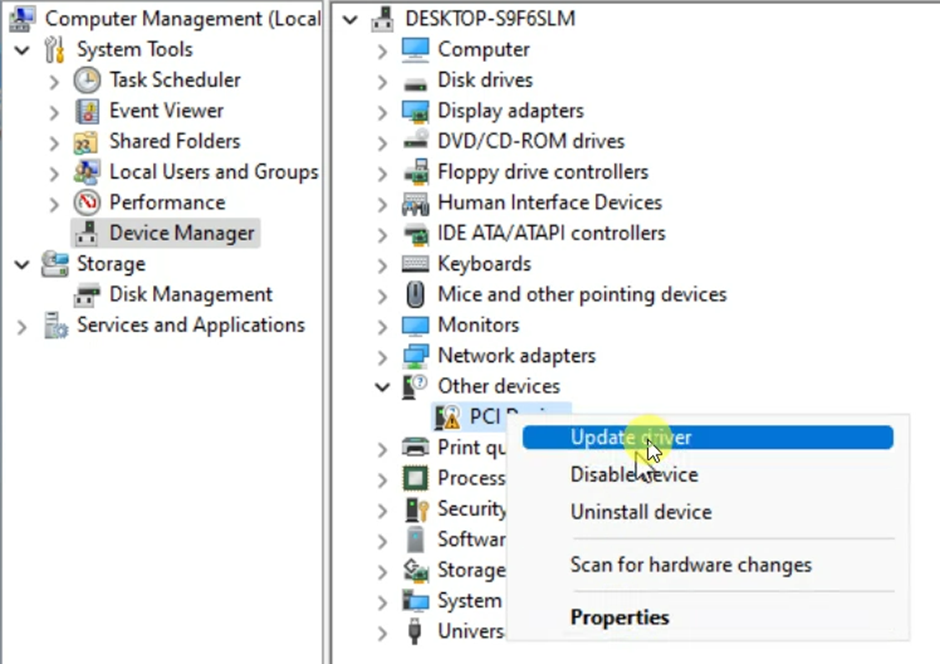
Unlike KVM, in Proxmox you will have most of the drivers installed on the windows 11. However, you need to install one driver, so click on the search button in windows 11 and type computer management.
And click on on it.
In the computer, management chooses device management.
Only one PCI device under Other device doesn’t have a driver.
Right-click on the PCI device and click on Update driver.
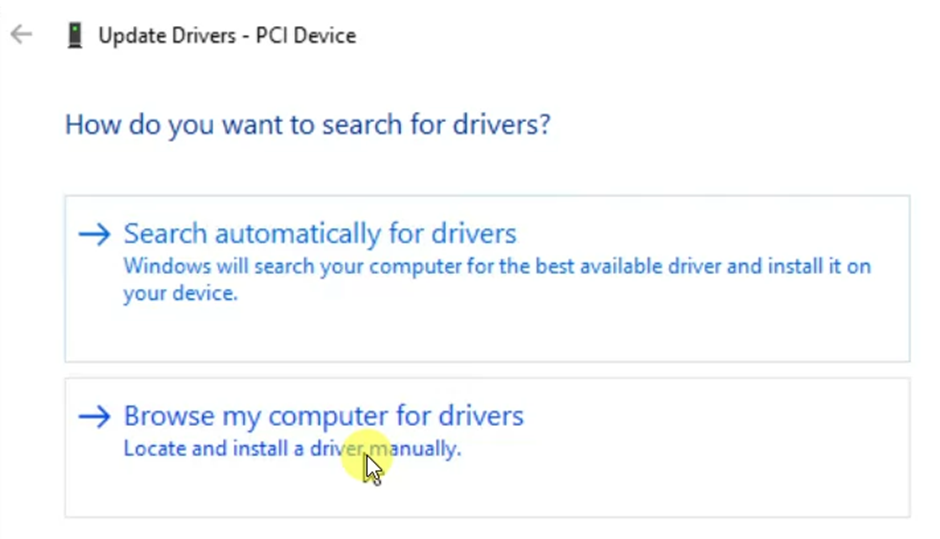
The driver is located in the virtio driver iso we attached as a secondary cdrom during the installation.
So choose to Browse my computer for drivers.
Choose the Virtio cdrom and click on Next.
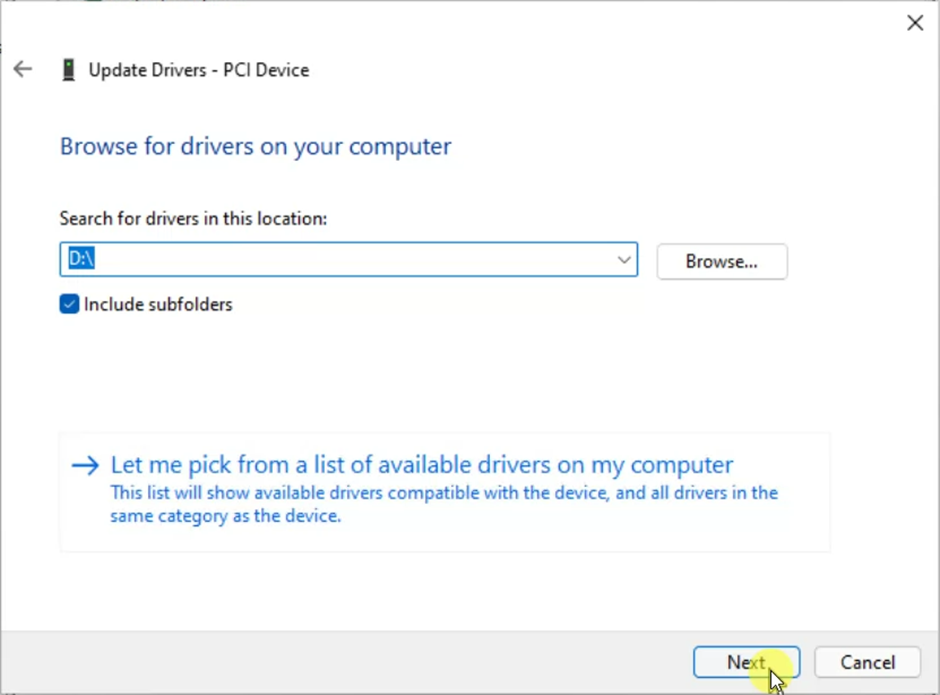
The drivers will be installed and you will see no other drivers requires update.

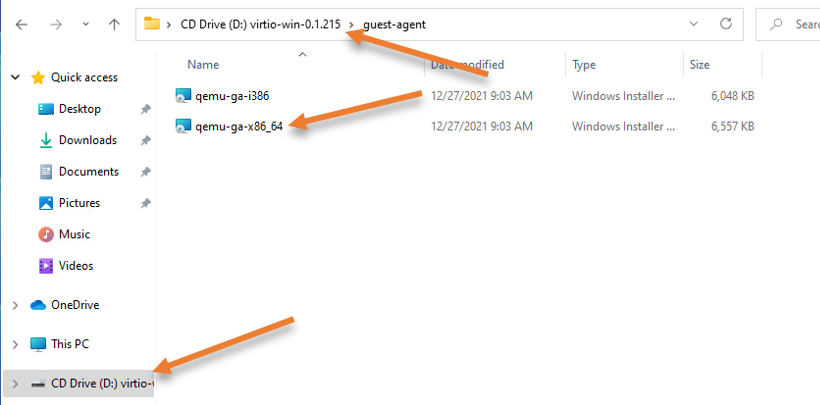
Install the QEMU/KVM guest agent on Windows 11.
For the windows 11 virtual machine to work perfectly, you will also need to install the KVM guest agent on the VM.
Go to file explorer, Open the virtio driver that we attached as CDROM.
Since we have 64bit OS, double click on qemu-ga-x86_64
The installation will begin, and you may go ahead and install the Guest agent on the virtual machine and reboot the machine.
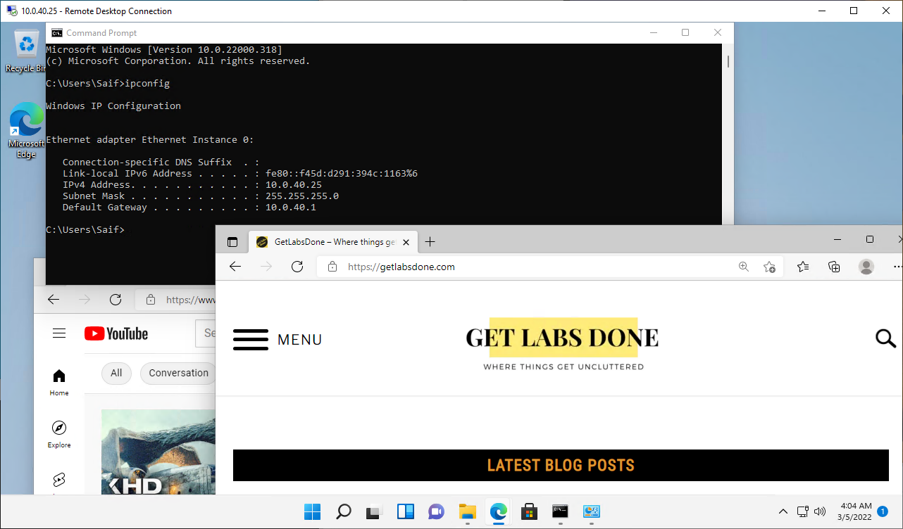
That’s it we have successfully installed the windows 11 virtual machine in the Proxmox server. You can either use Windows 11 through the Proxmox console or enable the RDP on the windows 11 machine and start using it.
You need to make sure to connect the network adapter back or configure the IP address for your virtual machine if you don’t have a DHCP server. Based on how you have configured the Network.
And using Windows 11 with RDP is the best option, and as you can see, I was able to access the windows 11 machine using the RDP, and I can access the internet as well.
Introduction
This guide will help manually add VirtIO drivers to Windows ISO’s so that the drivers are automatically installed and available to a Windows VM on Proxmox. This way the VirtIO ISO will not need to be attached to a virtual machine on Proxmox and there will be no need to manually load the drivers 1-by-1 in Windows Setup at install time. While these ISO’s should work with any KVM based virtualization, I am only testing them using a Proxmox host.
By slipstreaming these drivers direct into an ISO, it drastically reduces the work required to setup new Windows based VM’s by removing the need to manually install these drivers for each machine.
Tested Windows Versions
Just because I have not tested a version of Windows does not mean the methods outlined here will not work. They may work as is, with modification or not at all. Feel free to try other versions as needed.
Disclaimers
I also am not covering how to inject updates into Windows, though it is possible using similar methods. Should you want to also inject Windows updates I suggest you research the topic and incorporate the additional setup and commands into your workflow.
What are VirtIO Drivers?
In brief, VirtIO drivers are drivers designed to allow Windows VM’s to perform better when used with KVM based virtualization, like Proxmox currently uses. This includes but is not limited to: display drivers, storage drivers, networking drivers, etc. The VirtIO ISO also contains the qemu guest agent which allows the KVM host (Proxmox) to have better control over a guest OS, in this case Windows. This allows functions like properly shutting down a Windows VM from Proxmox’s controls. The ISO also contains the Balloon service files as well as the driver, which when installed allow a Windows guest to work with the memory ballooning feature of KVM/Proxmox. Generally speaking, the drivers make the VM run more smoothly, with more control and less issues.
Resources
For entries with win# replace «#» with whatever version/abbreviation you like. Ex: iso-win10 or drv-win2k19.
After making the above directories, we need to copy files from the ISO’s to the proper locations.
The VirtIO contents is explained here. The gist is there is a folder for each type of driver (display, network, etc.). Within each folder are multiple folders, one for each version of Windows. Within each of those folders is a folder for the CPU architecture like amd64, ARM64 or x86. We only need to inject the drivers that match the same version of Windows being used with the same architecture planned (generally speaking only «amd64»).
I copied all the files/folders in iso-virtio to drv-win#. I then went into each folder and deleted any folder representing a version of windows other than the one matching the drv-win# folder, the version of Windows we are currently working on injecting drivers in. Ex: if working with a Windows 10 ISO, in the NetKVM directory select all folder, ctrl+click the w10 folder to de-select it and then delete. This will leave only the w10 folder in the NetKVM folder. Repeat this for every folder under drv-win#.
While neither file in guest-agent is a driver, I would keep at least the version matching the architecture (typically the x86_64.msi file). It will prove helpful post install.
I then went back to the drv-win# folder.
This should leave just the folders/drivers needed for the version of Windows we are injecting the drivers into. This is important to help reduce the size of an image and to avoid having incompatible drivers loaded/installed.
Optional but Recommended
I recommend taking the drv-win# folder and copying it to the iso-win# folder. Doing so will help make post install steps easier.
Now we need to copy/move the install.esd or install.wim (depends on Windows version) file from the Windows ISO to the wim-win# directory. We also need to copy the boot.wim file.
This should leave us with:
Slipstream VirtIO Drivers into Windows ISO
This process is repetitious. .wim files (and .esd) often have multiple indexes. So when you boot from a Windows 10 ISO for example, and you have options to install «Windows 10 Home», «Windows 10 Pro», etc. each is a different index in the same install.wim/install.esd on the same ISO. This means we need to inject the driver into each option we intend to keep/use. We also need to inject the driver into the boot.wim, which also has indexes (generally 1 for Win PE and 2 for the Windows Setup). Unless PXE booting and using the Win PE portion, we only need to inject into the Windows Setup portion for the boot.wim.
To cut down on this, I recommend removing any index (option) that you do not intend to use ever. For example if you will never be using «Windows 10 Education» from a Windows 10 ISO, better to remove it then to spend time injecting drivers to it. We will cover how to do this soon.
Getting Wim Info
This command will display information about a given image file (.wim or .esd). Primarily we want to know how many indexes there are, and which index(s) we will use and which we won’t.
(Situational) Remove Unused Indexes
This command will remove the designated index from the image. If you are unsure, do NOT delete an index. Only use this command to delete options from an ISO you are sure you will not use. I also highly recommend to re-run the command from step 1 above after removing each index. This is because options are re-indexed after each removal. I E: if index 3 was «Windows 10 Home» and index 4 was «Windows 10 Pro», after removing index 3, «Windows 10 Pro» now becomes index 3 instead of 4. A KA: Dont assume the indexes are the same after removing another.
(Situational) Convert. esd to. wim
This step can also take a relatively long time (like 5-15 mins on a modern machine). Just let it run to completion.
Per Index Steps
Perform the steps 4-7 in order for a single image/index before repeating them for the next.
Replace install.wim with boot.wim when injecting drivers into the setup image.
Mount an Image
In this step we mount an image/index to inject the drivers into. This is similar in concept to mounting an ISO except that we are mounting a specific index within the install.wim or boot.wim image.
Inject/Slipstream Drivers
In the above commands, -Recurse has the command look through all the folders and subfolders of our drv-win# directory for drivers. The -ForceUnsigned switch removes the requirement for drivers to be digitally signed to be installed which may be required for some drivers in the VirtIO collection.
Verify Drivers Have Been Added
Once the drivers have been injected, we need to save the changes to the image while we un-mount it.
Final One Time Steps (per ISO)
The proceeding step is meant to be done after steps 4-7 have been repeated for each file/index required. Be sure that you have done steps 4-7 for the setup index of boot.wim and at least one index of the install.wim.
Copy Updated. wim Files Back to ISO Folder
We need to take the modified install.wim and boot.wim and place them back in the ISO file/folder structure. These steps can be done in File Explorer.
Rebuild Windows ISO
Our last step takes everything we have done and rebuilds a new ISO using the updated images with the drivers contained within them. The resulting ISO will be what we want to install Windows VM’s from going forward.
This particular step doesn’t have ADK/PS variations, it’s just a single command. As far as I am aware, the same command can be run from either ADK (cmd) or PS.
Replace new-iso-name.iso with the desired name of the new Windows ISO. I recommend this not be the same as the original ISO. The above command also assumes UEFI bootable media, I am personally not concerned with BIOS booting Windows.
This will allow for ISO images larger than 4.7GB single layer DVD’s and beyond the approx. 4 GB install.wim limit for an ISO.
Post Install Using the New ISO
After installing Windows in a Proxmox VM using your new ISO, there are still a few steps that you need to take to get the most out of it. Earlier in the guide, I recommended copying our drv-win# folder to the iso-win# folder. I am going to assume in the steps below this was done. If not, you will need to mount the VirtIO ISO/disc for the current Windows VM to finish the post install steps.
Install QEMU Guest Agent
The Windows ISO (and the VirtIO ISO) which should be still mounted post Windows Install as a CD/DVD drive/disc contains a folder drv-win#\guest-agent which should contain at least a single .msi file (if not 2 files) named qemu-ga-i386.msi or qemu-ga-x86_64.msi (for 32bit/64bit Windows OS’s respectively). This is similar to the VMWare/ESXi guest agent allowing the host (in this case Proxmox) to have more accurate information of and better control over its guest VM’s.
To install this on the Windows guest VM, in File Explorer:
A command prompt window will open briefly then vanish, that’s it. It should be installed.
Enable the Balloon Service
The Balloon driver and service allow KVM guests like our Windows VM to work with the memory ballooning feature of KVM. While our previous steps have added the driver to the ISO and thus our install, we still need to setup and activate the service for ballooning in our Windows VM.
To install/activate the ballooning service:
Reboot the VM
To finalize the post install configuration, reboot the Windows VM. To verify that the guest agent is working, you can look at the Summary of the Windows VM in Proxmox. Specifically under «Bootdisk size» should be the «IPs» entry listing the IP addresses of the VM with a button that says «More». The «More» button displays further guest agent network info.
You can confirm that the Balloon service is running from the Windows guest using the PS command: get-service -name ballo*. It should return a result stating the Balloon Service is running.
Conclusion
This guide should provide the means to:
Hopefully you find this guide helpful. Please open an issue should you have any corrections, updates, questions or input on this guide. Thank you.
Completing the installation of Windows Server 2022
Most of you will probably want to skip over this section as you’ve probably installed various versions of Windows a million times. The process for Windows Server 2022 is much the same as with any other version but I’ll list the basic steps here, nonetheless.
Step 1 – Power on the Server 2022 VM
Head over to the Proxmox Web GUI and find your new Server 2022 VM. Right-click on it, and click “Start”.
Powering on the new VM
Step 2 – Launch the console
Once the VM has started up, simply click on the “Console” button in the top right-hand corner of the Proxmox interface.
Launch the VM’s noVNC console
This will launch a new browser window that will display the VM’s screen contents (i.e. what you’d see on your computer monitor if the VM was a physical server).
Step 3 – Provide regional settings
The first Server 2022 setup screen you’ll be presented with will ask for some regional information. Simply select your country, preferred language, and keyboard layout. Then click “Next”.
I’m going with all “UK” settings but I suspect most of my readers will be selecting “United States” at this point.
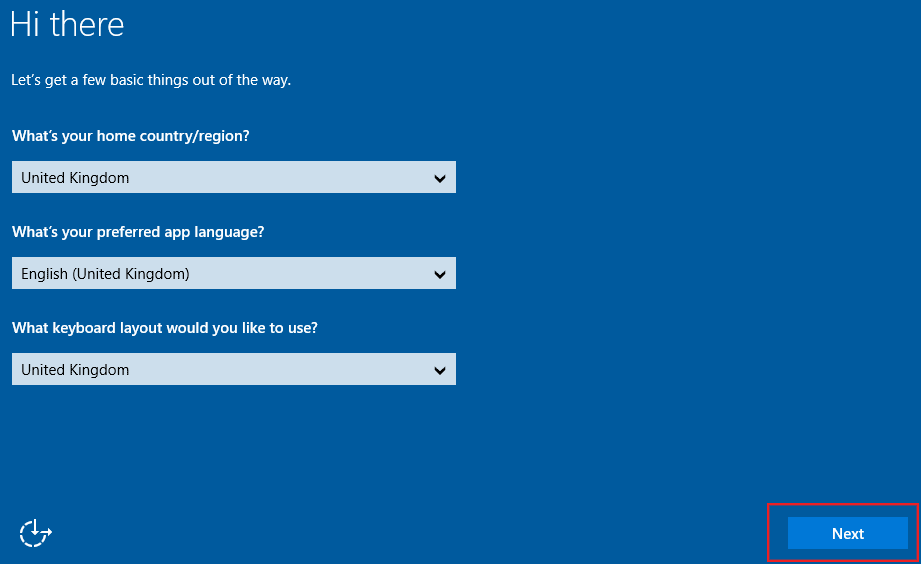
Server 2022 regional settings
Step 4 – Review and accept Microsoft’s license terms
Here’s the boring bit. You’ll need to read through the Windows Server 2022 license terms and then choose to accept or reject them.
I’m going to reluctantly accept them (the alternative is to give up and not use Windows!).

Accept or decline Microsoft’s license terms
Enter your chosen password twice, then click “Finish”
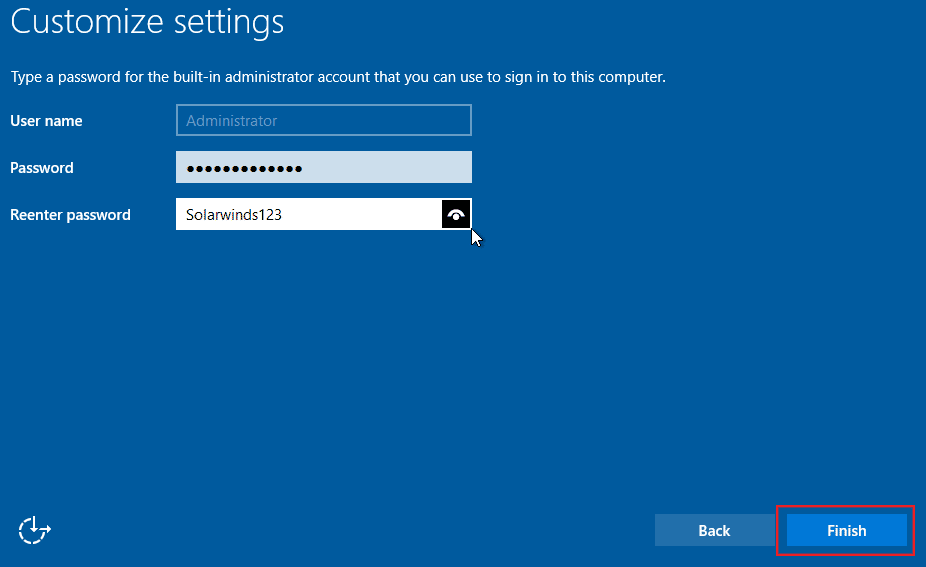
The VM will automatically restart, so sit tight for a few minutes.
Step 6 – Logon to Windows Server 2022
Unlike some of the more recent consumer versions of Windows, Server 2022 still requires you to press CTRL-ALT-DELETE to send the Secure Attention Sequence when logging on.
Of course, we can’t do that as we’re running Server 2022 inside a virtual machine. Instead, we must tell the Proxmox hypervisor to simulate the sending of this key sequence.
It’s very easy, just click the small arrow on the left-hand side of the console:
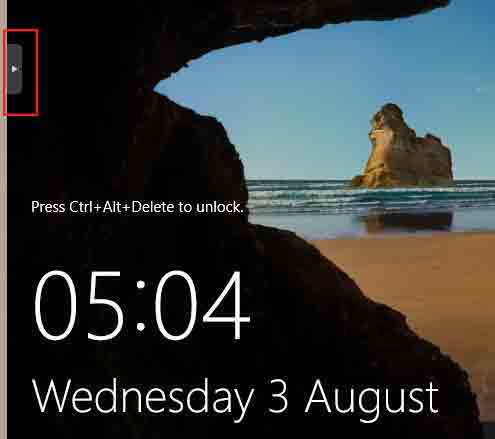
Expand VM console menu
This will pop out the noVNC additional settings menu. From here, click on the icon depicting a keyboard key (hovering over it will display “Show Extra Keys”). Now click on the bottom icon (“Send Ctrl-Alt-Del”):
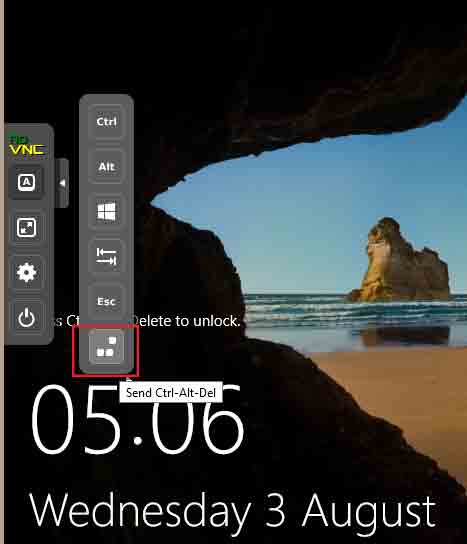
Send CTRL-ALT-DELETE to VM
Step 7 – Installing the VirtIO drivers and guest tools/agents
The Server 2022 VHD that we downloaded from Microsoft doesn’t include the VirtIO drivers. This makes sense because the image was intended for deployment on Microsoft’s Hyper-V hypervisor but we’re instead using Proxmox.
If you check in Device Manager, you’ll see that there are a couple of devices with either missing or generic drivers. For example, there’s this “PCI Device” that’s triggering a warning due to there being no driver present:
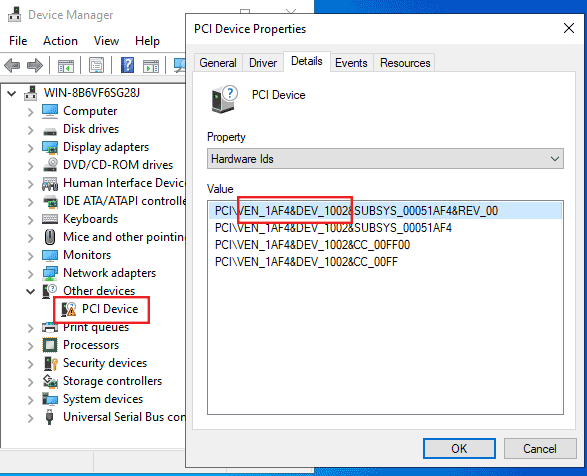
Missing VirtIO drivers for PCI Device
A quick Google of the PCI vendor ID (1AF4) and the device ID (1002), tells us that this is the VirtIO memory balloon. Although not critical, it would certainly be nice to get this device up and running with the correct driver (the memory balloon device allows Proxmox to reclaim some of the guest’s allocated memory).
Proxmox includes installation media for a version of the VirtIO drivers, however, they’re constantly being updated and improved so I always prefer to just download the latest stable version from the Internet.
There are a couple of ways to achieve this. One way is to download the VirtIO drivers ISO to the Proxmox host and mount the ISO to the VM’s virtual CD/DVD drive. Another way is to download the drivers from within the VM directly.
I prefer the second method, as the Windows VM already has Internet access (thanks to the virtual Intel E1000 NIC already having its driver present in the Server 2022 disk image) so it’s just a bit faster/easier.
From within the new Windows Server 2022 VM, you’ll want to launch Microsoft Edge, and then download virtio-win-guest-tools.exe from https://fedorapeople.org/groups/virt/virtio-win/direct-downloads/latest-virtio/virtio-win-guest-tools.exe
This is somewhat easier said than done as you’re not going to be able to copy and paste to the virtual machine yet. If you’re confident of your typing ability, you can just type the full URL directly into the Edge address bar and hit enter.
Click on the virtio-win-pkg-scripts link

Click the virtio-win-pkg-scripts link
Scroll to the Downloads section and click the “Latest virtio-win-guest-tools.exe” link
Click the link to the VirtIO Guest Tools
Once the download has completed, run the executable, and accept all the suggested defaults by clicking “Next” (a “Next, Next, Next install” as we call it in the business). The installer will install all drivers, as well as the QEMU guest agent and the Spice agent.
If we check Device Manager once more, the situation looks a lot better. As you can see, all devices have drivers and the “PCI Device” is now correctly identified as being the VirtIO memory balloon device:
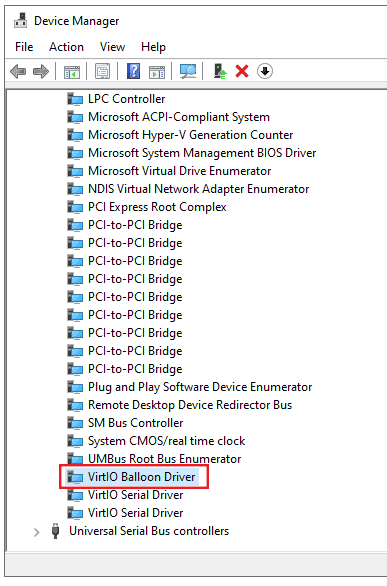
The PCI Device is now correctly identified
Attaching the imported disk
At this point, we no longer need the original “placeholder” disk that was created alongside the VM itself. To remove it, click on it, and then click “Detach”. Confirm the action if prompted.
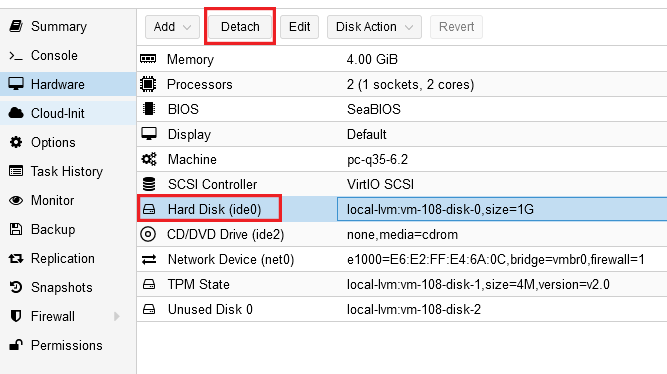
Detach the old “placeholder” disk that was created with the VM
With the old disk detached, it’s easily deleted by clicking on it, and then clicking “Remove”. Once again, confirm your intention to remove the disk, if asked for confirmation.
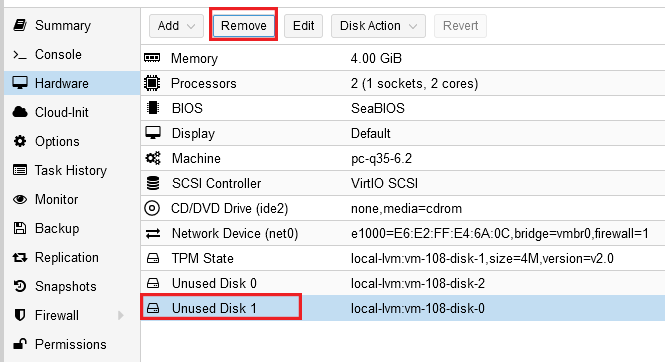
Remove the now-detached “placeholder” disk
Now, to attach the new disk, simply double-click it, then click “Add”.

Add the new Server 2022 disk as ide0
It’s important that we perform these steps in order, so that the newly imported disk is attached to IDE controller “ide 0”. If we attached the new disk before we removed the old placeholder disk, Proxmox would assign it to “ide 1”, meaning we’d be unable to boot from it. This is because VM’s can only boot from master devices and not slaves, so Proxmox would give you the cryptic message “Can’t create IDE unit 1, bus supports only 1 units“. Please don’t ask me how I know this 🙂
Importing the disk image into the VM
Now that we have our Server 2022 in the QCOW2 format, we must import it into our new VM. Before we can do this, however, we need to know the ID number of the VM (“vmid”).
If you made a note of the ID when creating the VM then great, if not, you can easily find it through the Proxmox Web interface. For example, it prefixes the VM’s name, in the left-hand pane:
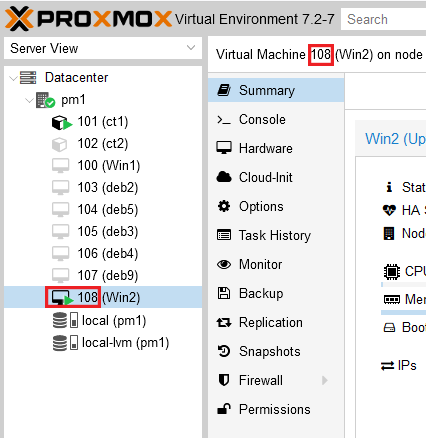
Checking the ID of the new VM
In our case, the command will be:
qm importdisk 108 WindowsServer2022.qcow2 local-lvm
The command will take a few minutes to run, and it will then report the “logical volume” that has been created from the disk import:

The logical volume is reported after the disk has been imported
Downloading the VHD or ISO directly to the Proxmox host
I’m going to be deploying the evaluation version of Server 2022 as I don’t currently have a license to run it. Once the evaluation version expires in 180 days, I’ll decide whether or not I wish to retain it. If it’s proven its worth over that six-month period, it’s easy enough for me to purchase it, enter my new product key and convert Windows from the evaluation version to the real thing.
Head over to the Microsoft Evaluation Center for Windows Server 2022
Click on the link titled “Download the VHD” (or “Download the ISO” if you’re planning a traditional installation).
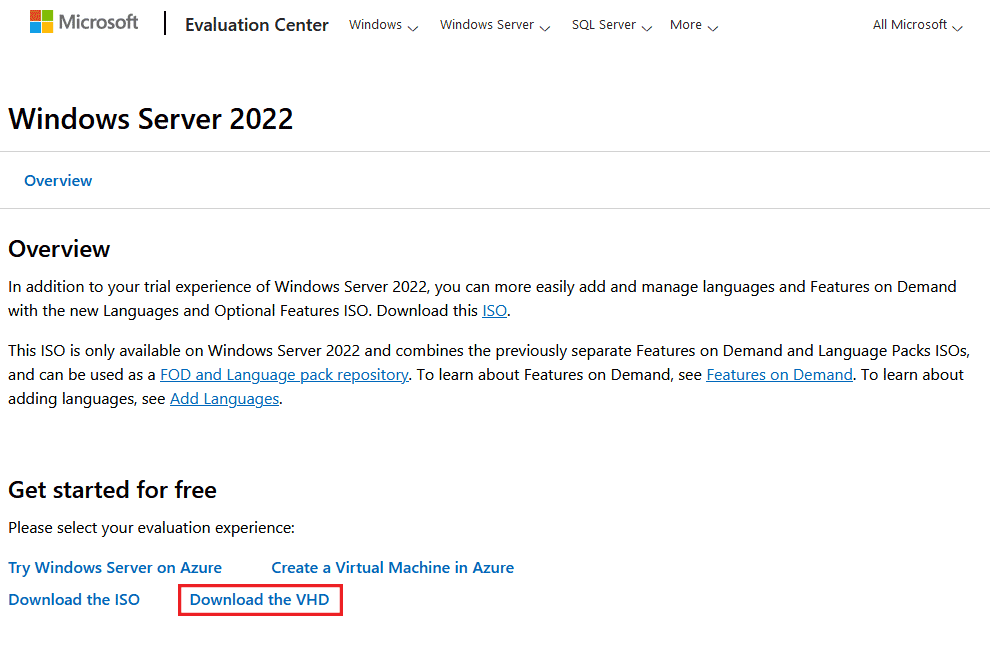
Click “Download the VHD” on the Evaluation Center webpage
You’ll be presented with a page asking you to “Register for your free trial today”. Simply enter your details into the form and click “Download now”.
Incidentally, I didn’t need to validate my email address by clicking an emailed link or entering a code. Not that I would ever suggest entering false details merely to get to the next page, of course.
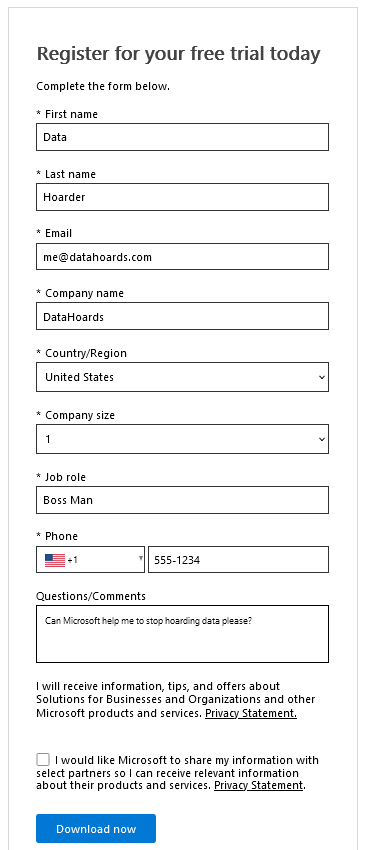
Registering to download the Windows Server 2022 trial
At this point, you should find that you’re presented with a list of download links. You don’t want to click the link as that will download the ISO or VHD file to your computer. Instead, you want to copy the download link to your clipboard. Later we’ll use this link to download the ISO or VHD directly to the Proxmox host.
Find your preferred language and then right-click on the download link titled “64-bit edition”. Then click either “Copy” or “Copy Link”, depending on the browser you’re using.
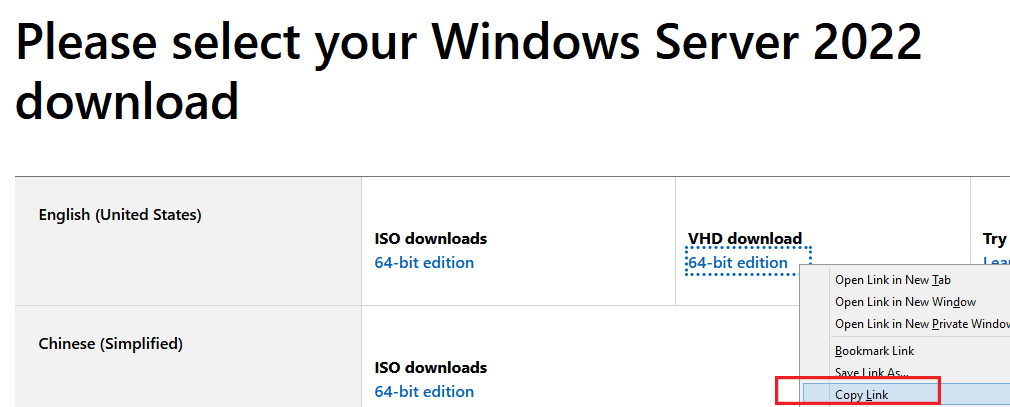
Copy the VHD download link
Now that we have the download link to the Server 2022 media, we need to download it directly to the Proxmox host. You can access the host however you prefer (SSH, console, etc) but I’m going to SSH into it using PuTTY.
Once you’re logged in and at the Bash prompt, you need to change to the directory (using the “cd” command) that will hold the download. I want to download the VHD to the temporary directory so I enter “cd /tmp”
Change to the /tmp directory on the Proxmox host
We’ll use “wget” to initiate the download. The full syntax we’re going to use is:
Something to note is that the download URL may contain an ampersand (&) character, and this will confuse Bash as it’ll think we’re trying to run the command in the background. Luckily, we don’t need any of the parameters in the URL after the first ampersand so we can just remove them.
For example, the download URL that I have for the English version of Server 2022 is:
but as we don’t need anything after the first ampersand, I’m going to shorten it to:
Therefore, for me, the complete command will be:
wget -O WindowsServer2022.vhd https://go.microsoft.com/fwlink/p/?linkid=2195166
Of course, your link will be different so remember to substitute it. You may proceed to the next step whilst the download is taking place.
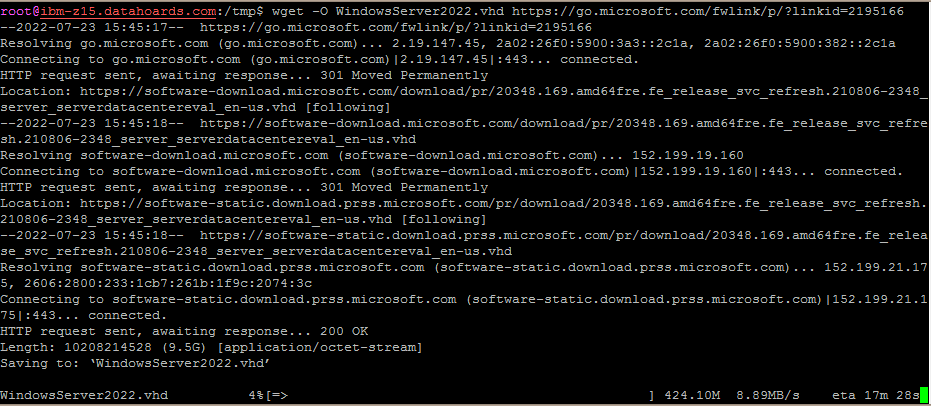
Downloading the Server 2022 VHD to the Proxmox host
This step is optional and only applies if you’ve chosen to download the ISO rather than the VHD.
You’ll want to move the downloaded ISO file from the temporary directory to the /var/lib/vz/template/iso/ directory. This will allow the ISO to be accessible through the Proxmox GUI and will allow you to easily attach it to a VM’s virtual CD/DVD drive.
The command, of course, is simply:
mv WindowsServer2022.iso /var/lib/vz/template/iso/
Creating a new VM ready for Windows Server 2022
The next step is to create a new Virtual Machine with appropriate resources. We can do this even if the VHD is still being downloaded, as we don’t need to make any reference to it yet.
I won’t go over the individual steps to creating a VM in Proxmox. If you’re reading this post then I’m sure you’re already aware of them. Instead, I’ll show you the virtual hardware/resources that I chose for my Server 2022 machine:
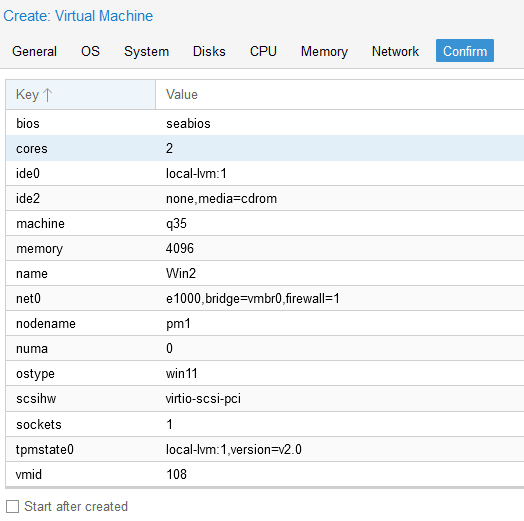
Virtual hardware for Server 2022 VM
You can of course alter the virtual hardware allocation as you see fit. If you have a powerful Proxmox host, you may wish to allocate more CPU cores or more RAM, for example.
It’s worth making a note of the “vmid” value (the virtual machine’s unique ID number that Proxmox uses) at this point, as we’ll need it later on when importing the disk image.
Take note of the “VMID”
Choosing between Windows Server 2022 ISO and VHD
As mentioned, Microsoft offer not only the traditional ISO installation media but also a VHD file intended for deploying virtual Server 2022 machines. V HD stands for “Virtual Hard Disk” and it’s basically a file that contains all the data that a traditional hard drive would. In other words, you can attach a VHD file to a hypervisor (such as Hyper-V) and the system will use the VHD in place of the hard drive. When the virtual machine reads from or writes to its virtual hard drive, the hypervisor will perform these operations against the VHD.
As I wanted to run Server 2022 inside a virtual machine, I decided that choosing to download the VHD rather than the ISO would make more sense. Although the VHD is primarily intended to be used with Microsoft’s own hypervisor (Hyper-V) or cloud computing platform (Azure), it’s a standard format and I was sure I could get it to work with Proxmox.
Why did I choose the VHD over the ISO? Well, to me it made sense that Microsoft would tune the Windows installation to run in a virtualized environment (for example, drivers for virtual hardware would already be in place).
Of course, should you prefer, there’s no problem with downloading the ISO instead and performing a regular installation, much as you’d do if you were deploying the operating system to a physical, bare-metal server rather than onto a VM.
Changing the Proxmox VM’s boot order
We know that the new disk is “ide 0”, so click on “Options”, then “Boot Order” and then “Edit”.
You can now enable or disable boot devices as you see fit, as well as dragging and dropping them to the order you prefer. For me, I like all of my Proxmox VMs to be able to boot only from the main disk, without attempting to boot from CD/DVD drives or network (PXE) devices. This speeds up the boot process a little.
To achieve this, and to keep things simple, I’m going to therefore leave the boot order as it is, but disable everything except “ide 0”:
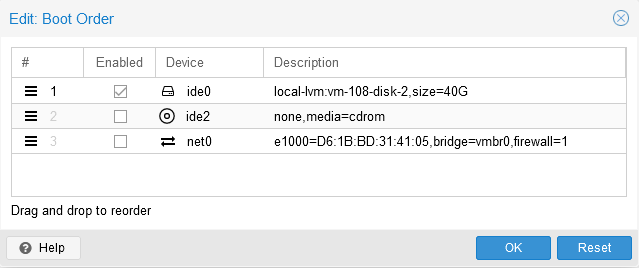
Change the boot order so that only the Server 2022 disk (ide0) is enabled
Converting the VHD for use in Proxmox
Proxmox isn’t able to run a virtual machine directly from a VHD file. Instead, we need to convert the VHD to a different format.
Fortunately, Proxmox includes a piece of software known as qemu-img (“QEMU Disk Image Utility”, to give it its proper name) that we can use to convert the disk image. Proxmox uses the “QCOW2” (“QEMU Copy-On-Write”) disk image format by default so that’s what we’ll convert our VHD to.
Therefore, to convert our Server 2022 disk image from VHD to QCOW2, the complete command will be:
qemu-img convert WindowsServer2022.vhd -O qcow2 WindowsServer2022.qcow2

Converting the Windows Server 2022 VHD image to QCOW2 Format
Enabling the QEMU guest agent and SPICE agent features
With the QEMU and Spice agents installed, we can enjoy some added functionality. We just need to quickly enable it first, from within the Proxmox Web interface.
Step 1 – Shutdown the Server 2022 VM
To do this, double-click on “QEMU Guest Agent”, then tick the box next to “Use QEMU Guest Agent”, change the type to “VirtIO” and click “OK”.
Enable the VirtIO QEMU agent
Step 4 – Change the display to “SPICE”
To do this, click on “Hardware”, and then double-click on “Display”. Change the “Graphic Card” drop-down to “SPICE” and then click “OK”.
Change the graphics card to use SPICE
This tutorial looked at how to install Windows 11 on Proxmox. Overall, the process is very similar to other types of installations, with the exception being the TPM configuration and driver installation. As long as you set both of those up properly, you’ll have a fully functional Windows 11 virtual machine!
Thanks for checking out the tutorial on how to install Windows 11 on Proxmox. If you have any questions on how to install Windows 11 on Proxmox, please leave them in the comments!
