

Subject: zabbix installation error (Read 6535 times)
0 Members and 1 Guest are browsing this thread.
Greetings, dear forum users
Installing zabbix on ubuntu18.04 server.
I act according to the instructions: https://www.zabbix.com/en/download?zabbix=3.4&os_distribution=ubuntu&os_version=bionic&db=MySQLI reach the point:
b. Install Zabbix server, frontend, agent# apt install zabbix-server-mysql zabbix-frontend-php zabbix-agent
« Last edit: Aug 12, 2018 11:56:39 AM by ubuu »
Want to get help? Be sure to provide the requested information in full.
« Last Edit: Aug 12, 2018 11:54:23 AM by ubuu »
deb http://ru.archive.ubuntu.com/ubuntu bionic main restricted universe multiverse#deb-src http://ru.archive.ubuntu.com/ubuntu bionic main restricted universe multiverse
deb http://en.archive.ubuntu.com/ubuntu bionic-updates main restricted universe multiverse#deb-src http://en.archive.ubuntu.com/ubuntu bionic-updates main restricted universe multiverse
#deb http://ru.archive.ubuntu.com/ubuntu bionic-backports main restricted universe multiverse#deb-src http://ru.archive.ubuntu.com/ubuntu bionic-backports main restricted universe multiverse
deb http://security.ubuntu.com/ubuntu bionic-security main restricted universe multiverse#deb-src http://security.ubuntu.com/ubuntu bionic-security main restricted universe multiverse
Zabbix is an open source web monitoring tool. Used to monitor a wide range of IT components. This includes network devices such as servers, virtual machines, and applications. It provides many monitoring metrics such as network usage, CPU usage, and disk usage. This helps with troubleshooting when the system behaves abnormally. You can visualize performance metrics in the form of graphs, screens, maps, and overviews.
In this guide, we will show you how to install Zabbix Server on Ubuntu 20.04 LTS.
- Requirements for installing Zabbix on Ubuntu
- Installing and configuring Apache
- Install PHP and related modules
- Install MariaDB database server
- Create a Zabbix user and database
- Enable the Zabbix repository
- Install Zabbix server on Ubuntu 20
- Setting up Zabbix server
- Firewall setting
- Completing the installation of Zabbix in the browser
- Conclusion
- What’s new in Zabbix 5
- List of major innovations
- Improved security and reliability
- Scalability and performance
- New Zabbix Agent
- Simplicity and convenience
- Automation and discovery
- Native integration with ITSM systems
- Built-in integrations with alert systems
- New templates and plugins
- Installing Zabbix 5 on Centos
- Configuring SELinux for zabbix server
- Installing Zabbix 5 server in Ubuntu, Debian
- Configuring Zabbix Frontend
- Configuring Zabbix Server
- Setting up email alerts
- Changing the standard alert template
- Changing default monitoring templates
- Installing Zabbix Agent on Linux
- Installing zabbix agent on Windows
- Encrypted Connection Setting
- Did the article help? Subscribe to the author’s telegram channel
Requirements for installing Zabbix on Ubuntu
Before getting started, make sure you have a running Ubuntu 20.04 instance AND sudo privileges. Also, make sure you have a stable internet connection. Since without all this, the installation of Zabbix will not be possible.
Installing and configuring Apache
In this step, we will install the Apache web server. The first thing to do is to update all Ubuntu repositories lists and install Apache packages. To do this, run the following command:
$ sudo apt update
Now install apache with the following command:
$ sudo apt install apache2
Apache service will start after installation. But you can run it yourself by running the following command.
$ sudo systemctl start apache2
To start apache2 at system startup, enter the following command:
$ sudo systemctl enable apache2
Install PHP and related modules
The Zabbix interface is written in PHP, so you need to install PHP. Ubuntu provides PHP 7.4 in its repositories. Which we will install in this guide.
To install PHP packages, use the following apt command:
$ sudo apt install php php-mbstring php-gd php-xml php-bcmath php-ldap php-mysql
You can check the installed PHP version with the following command:

Checking PHP version on Ubuntu
After the installation is complete, go to the PHP configuration directory and edit the /etc/php/7.4/apache2/php.ini file. Change the settings as shown below and be sure to set the correct timezone according to your language.
$ sudo vim /etc/php/7.4/apache2/php.ini
Parameters to be changed
memory_limit 256M upload_max_filesize 16M post_max_size 16M max_execution_time 300 max_input_time 300 max_input_vars 10000 date.timezone=»Africa/Nairobi»
Restart the Apache service for the changes to take effect
$ sudo systemctl restart apache2
Install MariaDB database server
Next, we are going to install MariaDB as our database. User data and various metrics will be stored there.
To install the MariaDB server packages by running the following command:
$ sudo apt install mariadb-server
After installation, be sure to secure the database server with the command:
$ sudo mysql_secure_installation
Start by setting the root password.

Set password for mariadb
Then enter ‘Y’ for all other messages:

Configuring mariadb security
Create a Zabbix user and database
$ sudo mysql -u root -p
Create a Zabbix user and database as shown below. Do not forget to give him all the privileges, this is done as follows:
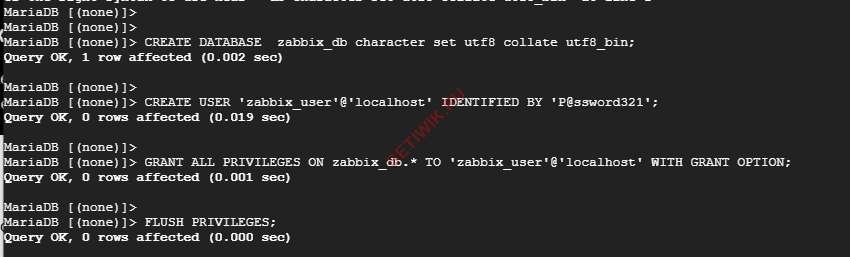
Then load the Zabbix database schema.
You will need to enter a password.
Enable the Zabbix repository
To add the Zabbix repository to your system, download the Debian package of the Zabbix release. This can be done using the wget command.
$ wget https://repo.zabbix.com/zabbix/5.0/ubuntu/pool/main/z/zabbix-release/zabbix-release_5.0-1+focal_all.deb
Then, to enable the Zabbix repository, type:
$ sudo dpkg -i zabbix-release_5.0-1+focal_all.deb
To sync the newly added repository with the system, update the package lists
Install Zabbix server on Ubuntu 20
To install the Zabbix server, install the zabbix-server-mysql package, It will provide MySQL support. And the zabbix-frontend-php package provides a web interface for the server. Zabbix-agent is designed for various metrics. The zabbix-apache-conf package is for running Apache.
$ sudo apt install zabbix-server-mysql zabbix-frontend-php zabbix-agent zabbix-apache-conf
Setting up Zabbix server
After installing Zabbix, some additional settings will be required. The configuration file is located at /etc/zabbix/zabbix_server.conf . So open this file with Vim editor.
$ sudo vim /etc/zabbix/zabbix_server.conf
Update the database configuration according to the user’s database settings.
Now enable the Zabbix autoload service at system startup. Next, restart the service for the new settings to take effect.
$ sudo systemctl enable zabbix-server $ sudo systemctl restart zabbix-server
You can check the status of Zabbix with the command:
$ sudo systemctl status zabbix-server

Checking Zabbix status on Ubuntu
Zabbix creates its own Apache configuration file «/etc/zabbix/apache.conf». It also creates a link to the Apache configuration directory. Use the below command to restart Apache services.
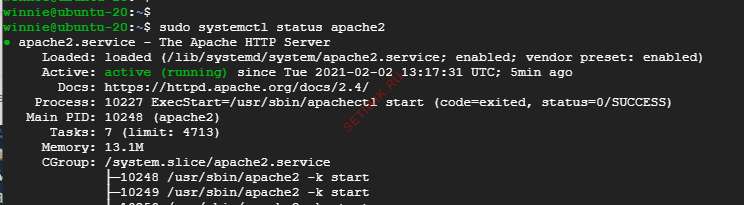
Also make sure Apache is running:
$ sudo systemctl status apache2
Zabbix installed in Ubuntu
Firewall setting
If you are behind a firewall, then you need to open Zabbix ports: 10050 , 10051 and HTTP. Run the following commands to open ports:
$ sudo firewall-cmd —permanent —add-service=http $ sudo firewall-cmd —permanent —add-port=10050/tcp $ sudo firewall-cmd —permanent —add-port= 10051/tcp
Then restart the firewall service for the rules to take effect:
$ sudo firewall-cmd —reload
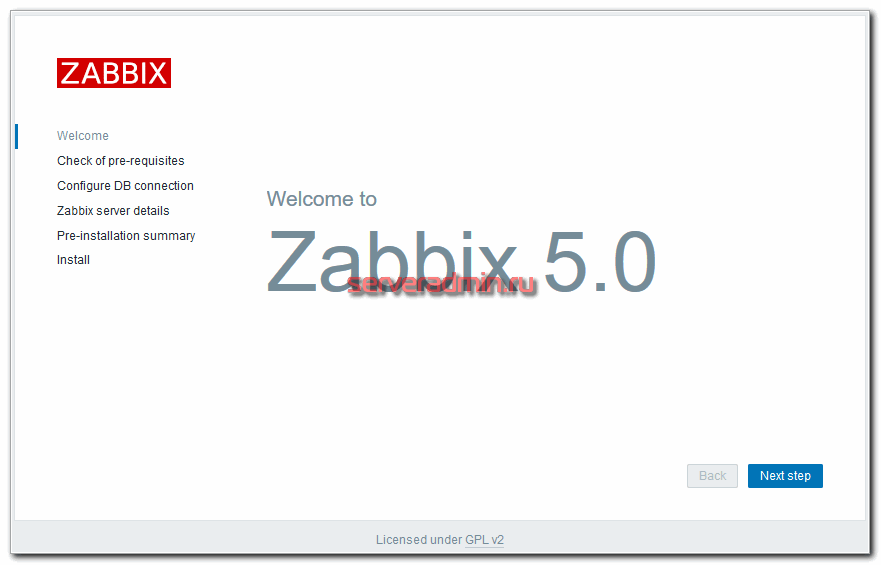
Completing the installation of Zabbix in the browser
Zabbix is now installed on Ubuntu 20.04. The only thing left is to complete the installation in the browser. To do this, launch your browser and go to the specified address:
server-ip is the IP address of the server where Zabbix was installed
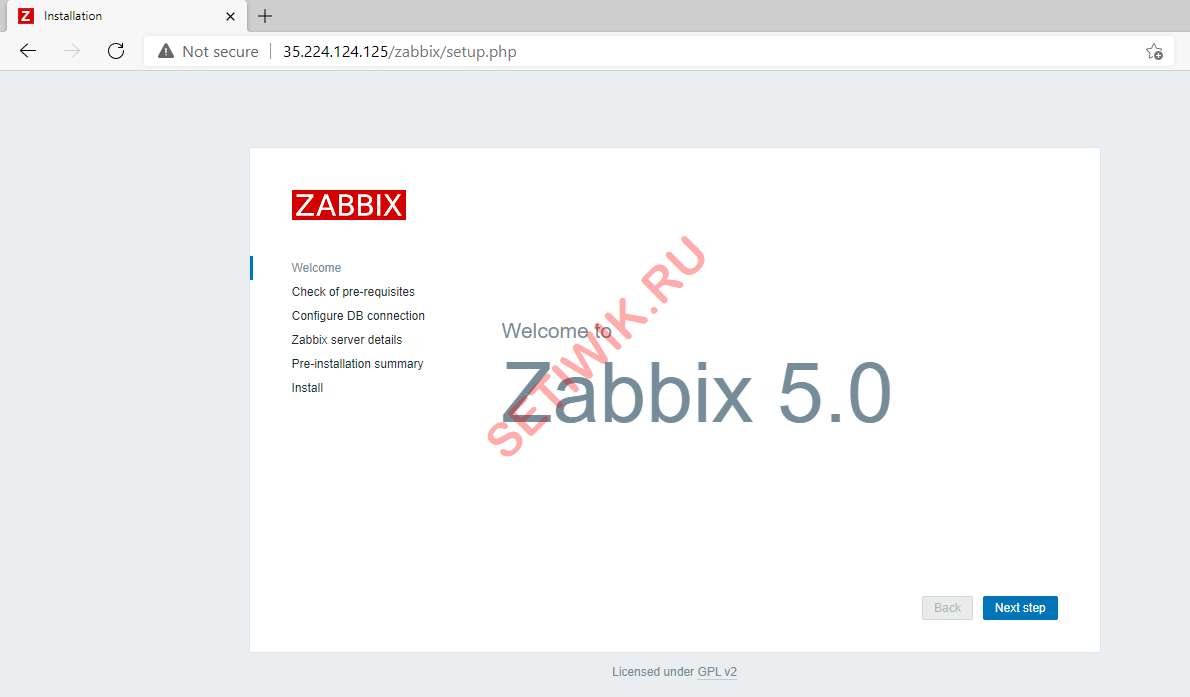
Zabbix server greeting
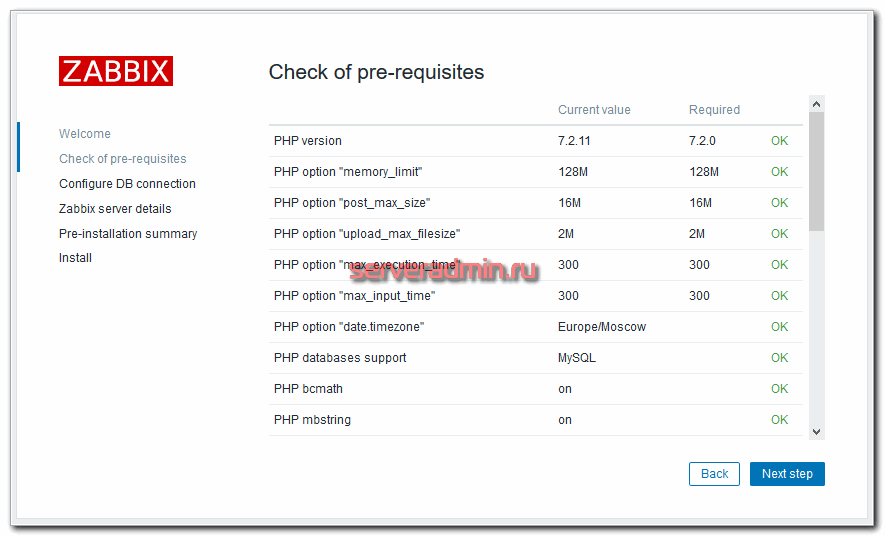
Make sure all the conditions are met by the server and click the «Next Step» button.
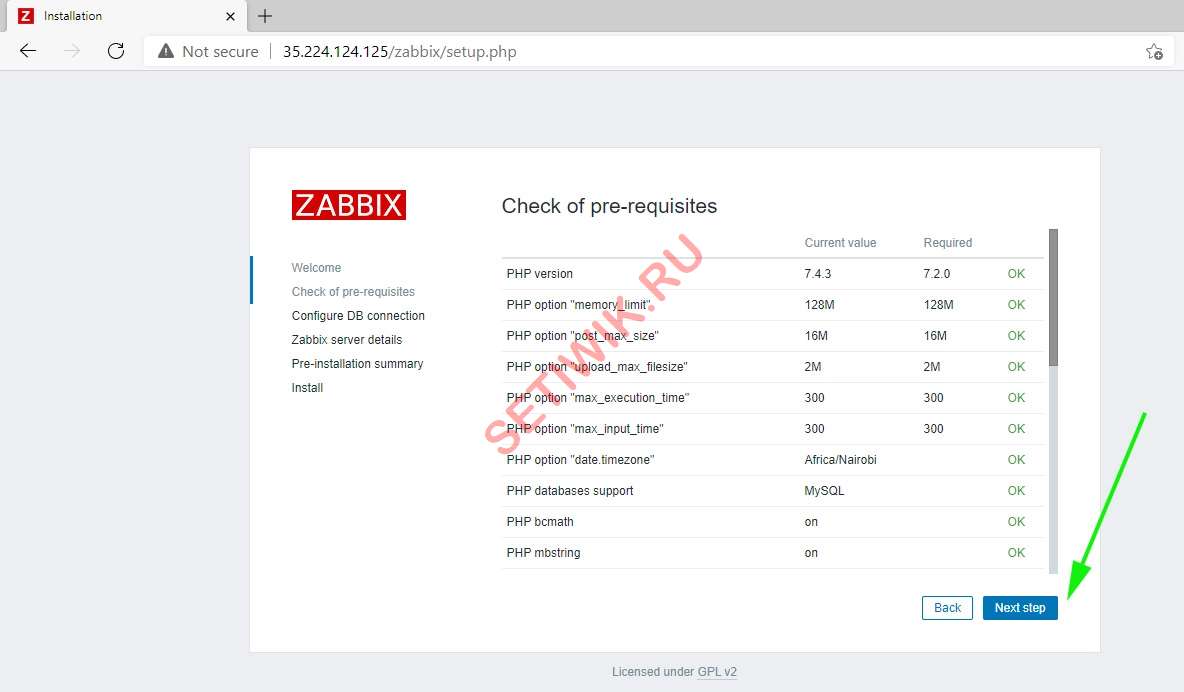
checking Zabbix preconditions
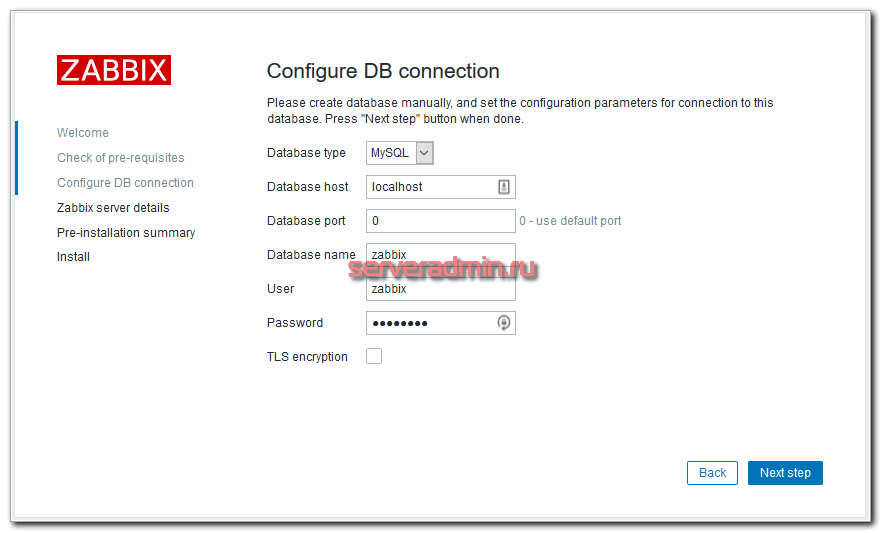
In this step, enter the database credentials that you created when you created the database for Zabbix in step 4. Click the Next Step button.
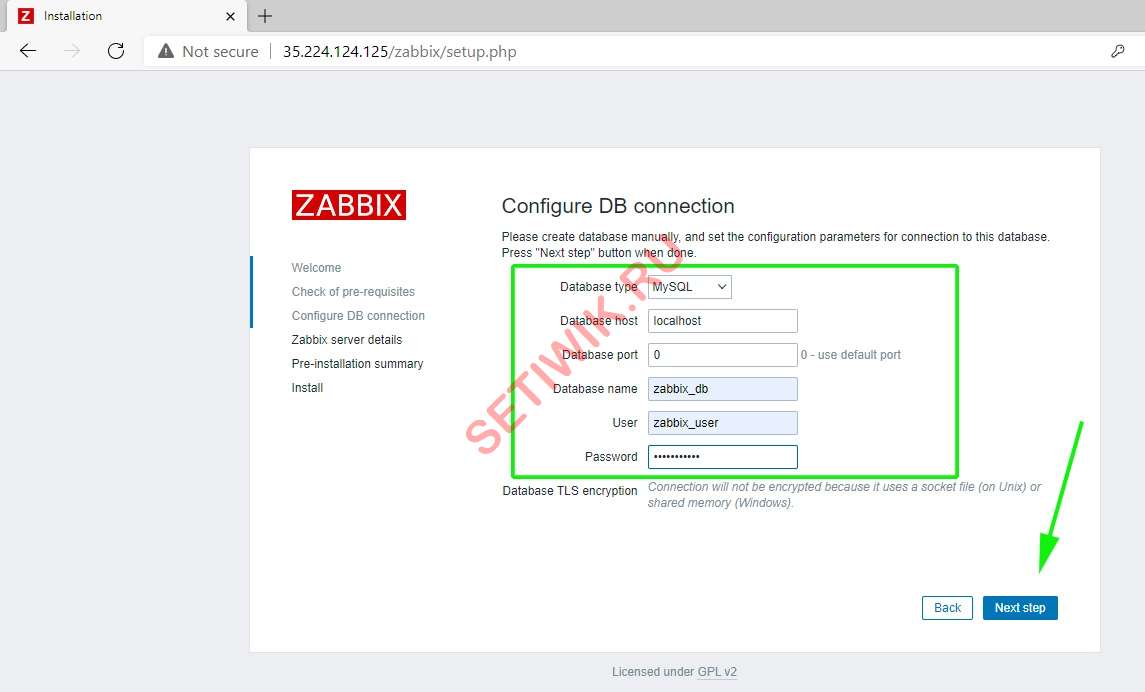
Setting up connection to Zabbix database
Information about zabbix server
You will receive a brief description of the preset. Make sure all configuration options are correct, and then click the Next Step button.

Zabbix preset brief information
If the installation completes successfully, then you should see congratulations, as in the picture below:
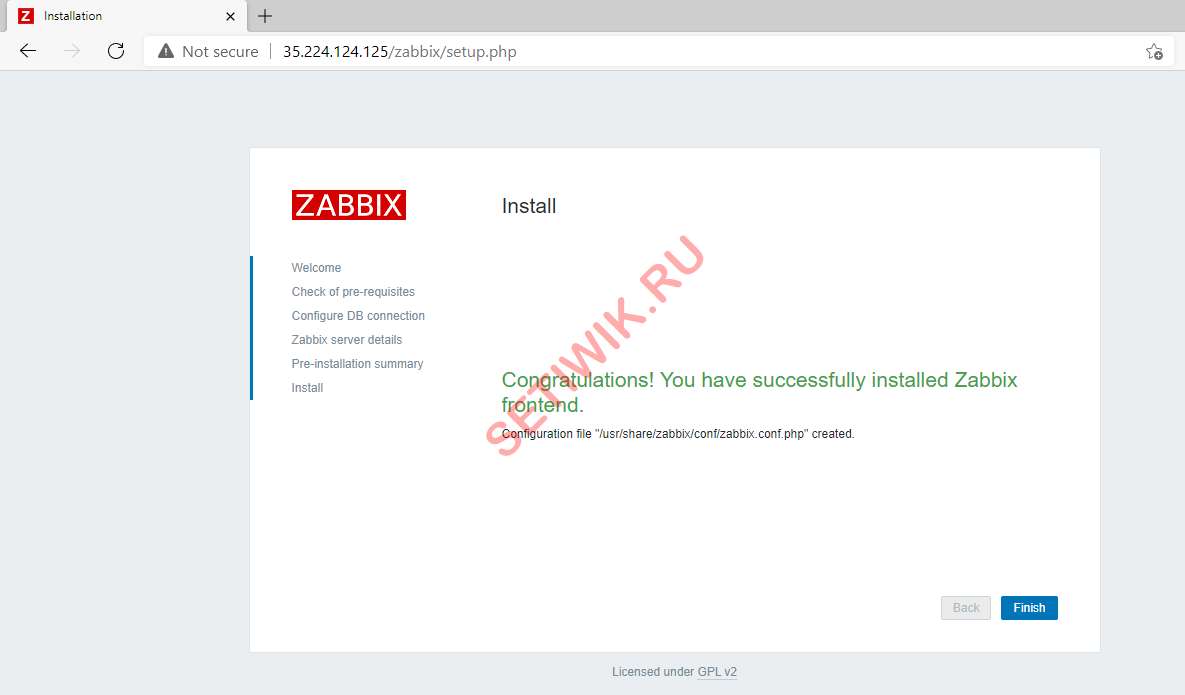
Zabbix server installation completed
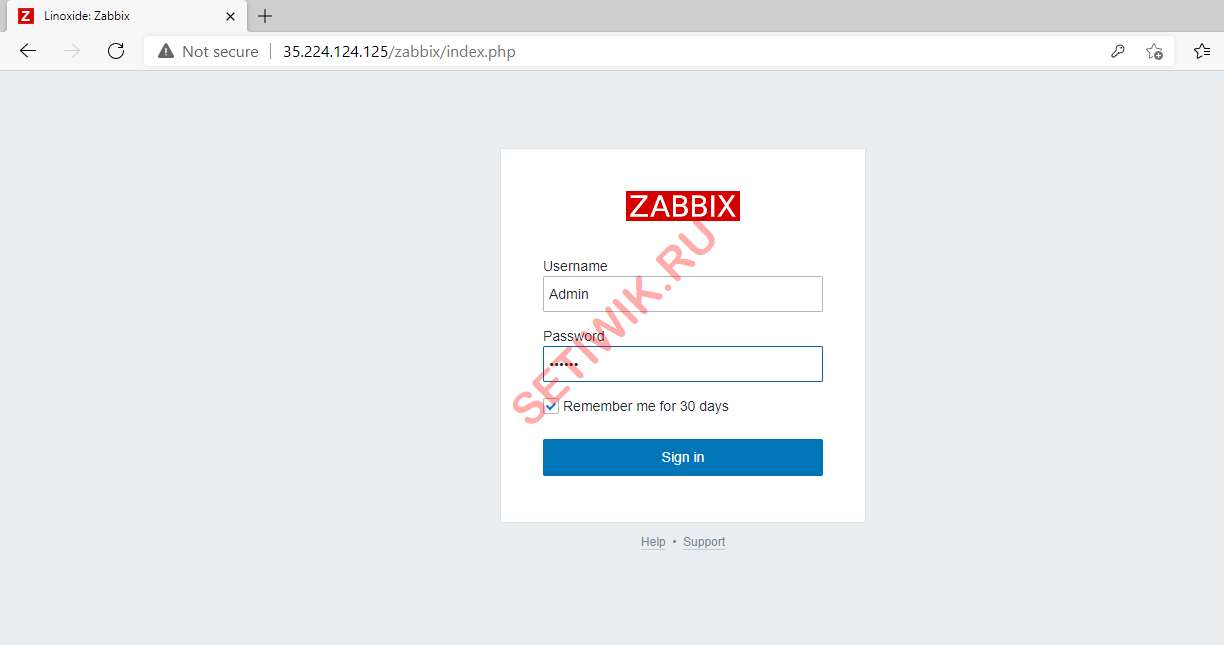
Click the Done button. You will be taken to the Zabbix login page.
Log in with the following default credentials:
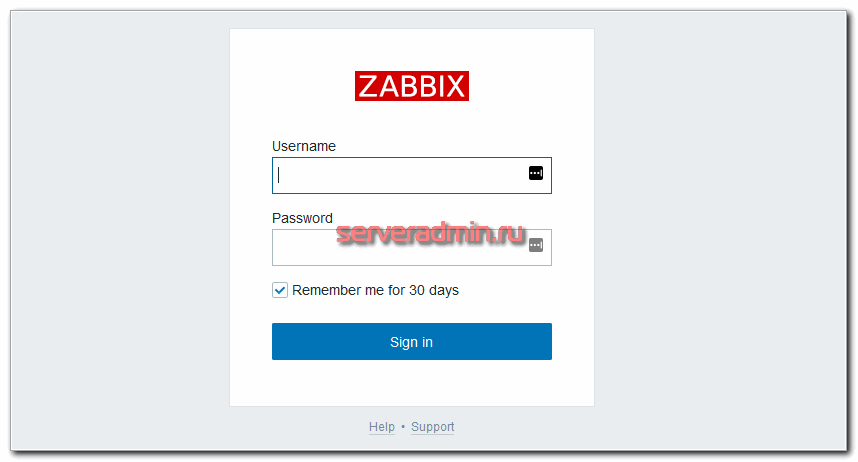
Zabbix server login page
After successfully logging in, you will see the Zabbix dashboard, you can see it in the picture below:
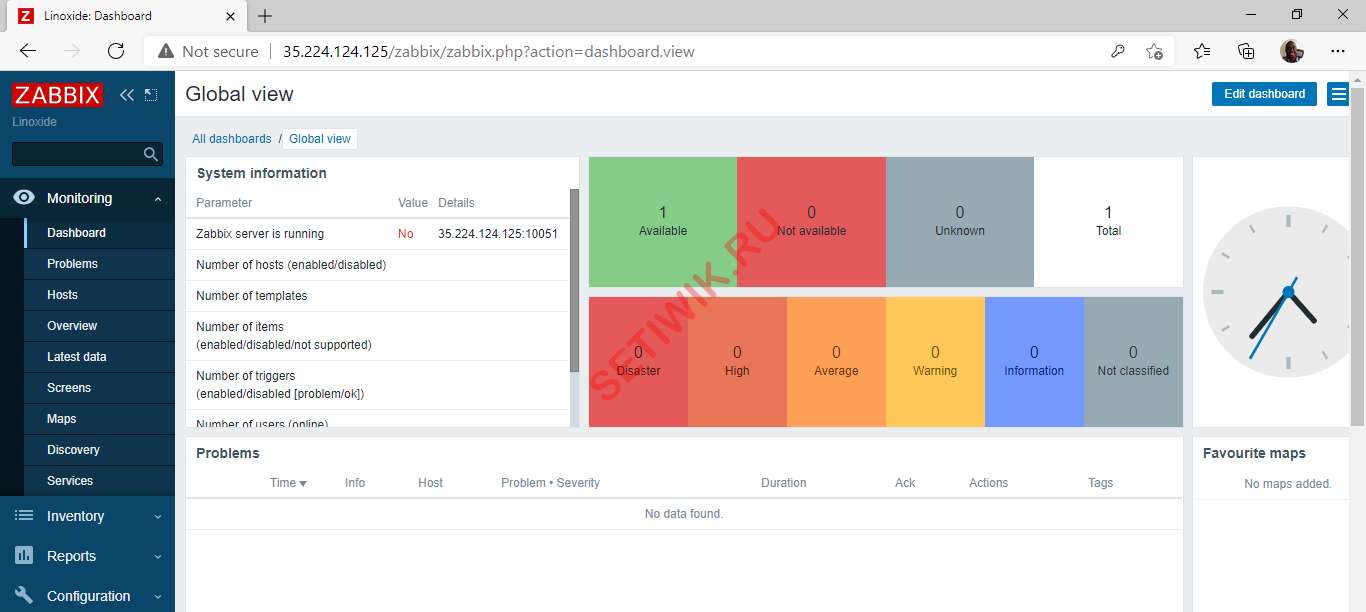
Zabbix server dashboard
Conclusion
On May 12, 2020, another LTS release of the popular open source monitoring system was released. I will talk in detail about the installation and initial configuration of Zabbix 5.0 using the example of CentOS, Debian, Ubuntu systems with screenshots and explanations. As usual, there are many useful innovations and improvements awaiting us, including a completely new agent.
If you have a desire to learn how to administer Linux-based systems, I recommend that you take a look at the Linux for Beginners online course at OTUS. Course for beginners, for those who are not familiar with Linux. Detailed information.
I have been familiar with the Zabbix monitoring system for a very long time. I started using it with version 2.0 or 2.2, I don’t remember exactly. In my opinion, today it is one of the highest quality open source projects. In order not to be unfounded, I will list its positive aspects:
Listed what I personally notice and appreciate. If you have an opinion on this matter, I’d love to hear it. Among monitoring systems, it seems to me that Zabbix is the highest quality and most popular product. Moreover, this is a full-fledged monitoring system with its own visualization, triggers, alerts, authorization, etc. For example, if you take Prometheus, then these are just metrics.
A distinctive feature of Zabbix is its versatility. This is a general purpose monitoring system. She does not specialize in one thing — hardware, network, microservices. It solves some narrow tasks not as successfully as specialized software. But Zabbix is distinguished precisely by the ability to combine everything in itself, into a single system. This is exactly why I love him.
One way or another, Zabbix is used by almost all large organizations. I watch speeches by representatives of various IT companies. Often there I see at least a slipping mention of zabbix or graphics from it. Here are the companies in which I noted the mention of zabbix — Sbertech, Magnit, 1C, Croc, Yandex. Money.
As I said above, Zabbix has good documentation and an extensive community. A lot of ready-made cases and speeches describing the solution of various problems. You can get to know each other and gain experience. No need to guess how to do something. Everything has already been done before us. Take at least the section on Zabbix on my site. How many checks I implemented on zabbix. Some he wrote himself, something he spied on others.
Well, in general terms, I described Zabbix and my attitude towards it. Let’s get down to specifics now. To begin with, I will analyze the main innovations in Zabbix 5.0. At the time of this writing, there was no Russian version of the innovations, so I will translate from English.
What’s new in Zabbix 5
Details of the new features of Zabbix 5.0 version can be found in the official document — What’s New in Zabbix 5.0 LTS. I will retell it in my own words and supplement it with comments.
So, what did we get in the new version 5.0.
List of major innovations
SAML (security assertion markup language) — security declaration markup language. It is an open standard for the exchange of authentication and authorization data. It makes it easier and more reliable to manage user access to system resources. Also, saml support simplifies integration with cloud identity providers — Microsoft ADFS, OpenAM, SecurAuth, Okta, Auth0, etc.
As I understand it, this is most relevant for cloud installations and integrations with other services.
Improved security and reliability
Zabbix 5.0 offers the following improvements in terms of security and reliability:
Scalability and performance
Zabbix 5.0 introduced data compression support for TimescaleDB. Together with the innovation of the previous version, when TimescaleDB support first appeared, this addition helps to save even more on data storage.
The web interface of Zabbix has also been changed to more efficiently support lists of millions of devices. I still don’t understand what the changes are. We’ll have to see it in practice.
New Zabbix Agent
The new agent received full official support. As I understand it, he left the beta status and use at your own peril and risk. Now it is stable and you can safely use it (but this is not certain yet :)). Main characteristics of the new agent:
I haven’t tested the new agent yet, but now it’s definitely time to do so.
Simplicity and convenience
In this plan, the following is implemented in 5.0:
In terms of configuration flexibility, Zabbix 5.0 has the following:
Automation and discovery
Automation is an integral part of the monitoring system. Therefore, Zabbix 5.0 adds support for the following changes:
Presenting data in a human-readable way is important. Zabbix 5.0 improves visualization by adding:
Native integration with ITSM systems
ITSM (IT Service Management) — IT service management. Zabbix 5.0 introduces a set of out-of-the-box integrations with standard cloud and local ITSM systems:
Developed guidelines defining standards for webhooks. They are designed to simplify the integration of Zabbix with external systems.
Built-in integrations with alert systems
Zabbix 5.0 introduces a new set of out-of-the-box integrations with standard alerting and notification systems:
New templates and plugins
Many existing templates have been updated. Also added new templates and plugins for monitoring various services, applications and devices. Most templates now use additional features to automatically discover various resources.
Now Zabbix has ready-made templates for:
And in general, there are many significant changes in the templates. If we take the previous version 4.0, then in comparison with it, the templates are simply unrecognizable. We need to rethink them. This, of course, is a big plus. Wider functionality is available out of the box and does not require manual finishing, as it was before. But on the other hand, templates have become more difficult to understand. They got really complex with a bunch of macros and auto-detections. Personally, I’m still fine with them, since I’ve known zabbix for a long time. But from scratch it will be difficult to delve into the essence.
And at the end of the overview of the innovations of Zabbix 5.0, the list of less significant changes:
And other changes, I’m tired of listing. Let’s get down to business now. Let’s install Zabbix 5.0 on our server running various operating systems.
Installing Zabbix 5 on Centos
Installing the 5th version of Zabbix has become even easier than the previous ones. I will use nginx web server and mysql database. First of all, you need to install and configure the CentOS 8 server.
Then we need to install Mysql server. I prefer Percona Mysql Server in this capacity, so I will install it. I choose Percona in this case so that later I can use their XtraBackup database backup tool.
Connect Percona repository and install mysql server.
# dnf install https://repo.percona.com/yum/percona-release-latest.noarch.rpm
# dnf module disable mysql
# percona-release setup ps80
# dnf install percona-server-server percona-toolkit percona-xtrabackup-80
# systemctl enable —now mysqld
We look at the temporary root password and use it to run the initial mysql setup script.
Set the root password, observing the complexity of the password — at least 8 characters, small and capital letters, numbers, special characters. After we do this, we proceed to install Zabbix directly.
Connecting the Zabbix 5 repository for Centos 8.
# rpm -Uvh https://repo.zabbix.com/zabbix/5.0/rhel/8/x86_64/zabbix-release-5.0-1.el8.noarch.rpm
Install Zabbix Server 5, web interface and agent.
# dnf install zabbix-server-mysql zabbix-web-mysql zabbix-nginx-conf zabbix-agent
Now let’s create a user and a mysql database for zabbix.
Just want to make an important remark about percona mysql server. With both repositories connected — zabbix and perkona, when updating the system via dnf update, you will get an error.
Let’s move on. Open the zabbix server config — /etc/zabbix/zabbix_server.conf and specify the connection parameters to mysql there. In the same place, I recommend immediately changing the timeout parameter, increasing it to 20 seconds.
Now you can start Zabbix Server 5.
# systemctl enable —now zabbix-server
If you didn’t disable SELinux in the Centos preconfiguration, you’ll get a startup error. The text of the error can be viewed in the system log /var/log/messages.
If you don’t plan to use SELinux, then just disable it and skip the next section. If you want to use, then configure further.
Configuring SELinux for zabbix server
In order to set up a zabbix server with SELinux, let’s download one ready-made module and create one of our own. Let’s start with finished.
Now let’s create our own module. In order for this to work, we must at least once fail to start zabbix server with selinux enabled.
Start zabbix server again.
# systemctl start zabbix-server
After these steps, zabbix server should work fine with selinux enabled. You can verify this by checking the zabbix server log — /var/log/zabbix/.
# cat /var/log/zabbix/zabbix_server.log
Now let’s prepare the web server. To do this, open the nginx config /etc/nginx/conf.d/zabbix.conf and set 2 parameters there:
listen 80;
server_name example.com;
Replace example.com with your virtual host name for zabbix server. If you want to connect not only by domain name, but also by ip address to the zabbix web interface, you need to add the default_server directive in addition to listen 80.
listen 80 default_server;
server_name example.com;
At the same time, you must remove the same directive in the main nginx config — /etc/nginx/nginx.conf. Instead of:
And finally, edit the php-fpm config — /etc/php-fpm.d/zabbix.conf, specifying your timezone.
Launching the web server components.
# systemctl enable —now nginx php-fpm
Now you can go to the ip address http://10.20.1.23 in the browser and the first page of the Zabbix Server 5 installer will open.
If you see an error connecting to the web server, then most likely your firewall is blocking connections. Centos 8 has firewalld enabled by default. If you do not need it and you do not want to configure it, then just turn it off.
# systemctl stop firewalld
# systemctl disable firewalld
If you don’t want to disable it, you can simply open the ports necessary for the web server to work — 80 and 443, as well as 10051 for the zabbix server itself.
# firewall-cmd —permanent —add-port=80/tcp —add-port=443/tcp —add-port=10051/tcp
# firewall-cmd —reload
If, like me, you prefer to use iptables instead of firewalld, read my detailed article on this topic — setting up iptables. In general, according to the preliminary preparation of the server, everything. Below is the same for Ubuntu / Debian. And in the next section, continue installing zabbix server through the web interface.
Installing Zabbix 5 server in Ubuntu, Debian
Install Zabbix 5 monitoring server on Ubuntu or Debian. The process will be approximately the same, so I will describe it in one general subsection. If you don’t have a server yet, then check out my articles on installing and configuring Debian 10.
We connect the necessary repositories. Debian 10:
# wget https://repo.zabbix.com/zabbix/5.0/debian/pool/main/z/zabbix-release/zabbix-release_5.0-1+buster_all.deb
# dpkg -i zabbix-release_5.0-1+buster_all.deb
# apt update
# wget https://repo.zabbix.com/zabbix/5.0/ubuntu/pool/main/z/zabbix-release/zabbix-release_5.0-1+bionic_all.deb# dpkg -i zabbix-release_5 .0-1+bionic_all.deb# apt update
# wget https://repo.zabbix.com/zabbix/5.0/ubuntu/pool/main/z/zabbix-release/zabbix-release_5.0-1+focal_all.deb# dpkg -i zabbix-release_5 .0-1+focal_all.deb# apt update
Install Zabbix Server 5 and some of its components, as well as mariadb as a mysql server.
# apt install mariadb-server zabbix-server-mysql zabbix-frontend-php zabbix-nginx-conf zabbix-agent
Set the root password for mysql using the preconfiguration script.
Create a user and database for Zabbix Server 5.
Next, open the zabbix server config — /etc/zabbix/zabbix_server.conf and specify mysql connection parameters there. Immediately I recommend changing the timeout parameter by increasing it to 20 seconds.
You can make sure that the server has started normally by checking the zabbix server log — /var/log/zabbix/.
Now let’s prepare the web server. To do this, open the nginx config /etc/zabbix/nginx.conf and set 2 parameters there:
At the same time, you must remove the same directive in the main nginx config — /etc/nginx/sites-available/default. Instead of:
And finally, edit the php-fpm config — /etc/zabbix/php-fpm.conf, specifying your timezone.
# systemctl restart nginx php7.3-fpm
# systemctl enable nginx php7.3-fpm
I draw your attention to the fact that the php version may differ depending on the operating system and the version in the base repositories. In general, it will be either php7.3-fpm or php7.2-fpm or php7.4-fpm.
If you see an error connecting to the web server, then most likely your firewall is blocking connections. Depending on the system and the image from which you installed it (for different hosts they are different), either iptables or ufw may be enabled by default. If you do not need them and you do not want to configure them, then just disable them.
# systemctl stop iptables
# systemctl disable iptables
# ufw disable
If you don’t want to disable iptables — you can simply open the ports necessary for the web server to work — 80 and 443 and 10051 for the zabbix server itself. How to do this, read my detailed article on this topic — setting up iptables.
In general, according to the preliminary preparation of the server, everything. We move to the browser and continue installing zabbix server 5 through the web interface.
Configuring Zabbix Frontend
So let’s proceed with the installation of Zabbix 5. On the next page of the installer, you will see a list of web server requirements. You should have everything in status as the appropriate configuration is installed with the package.
Next, specify the parameters for connecting to the Mysql database. We created the user and the database earlier, now we just specify them.
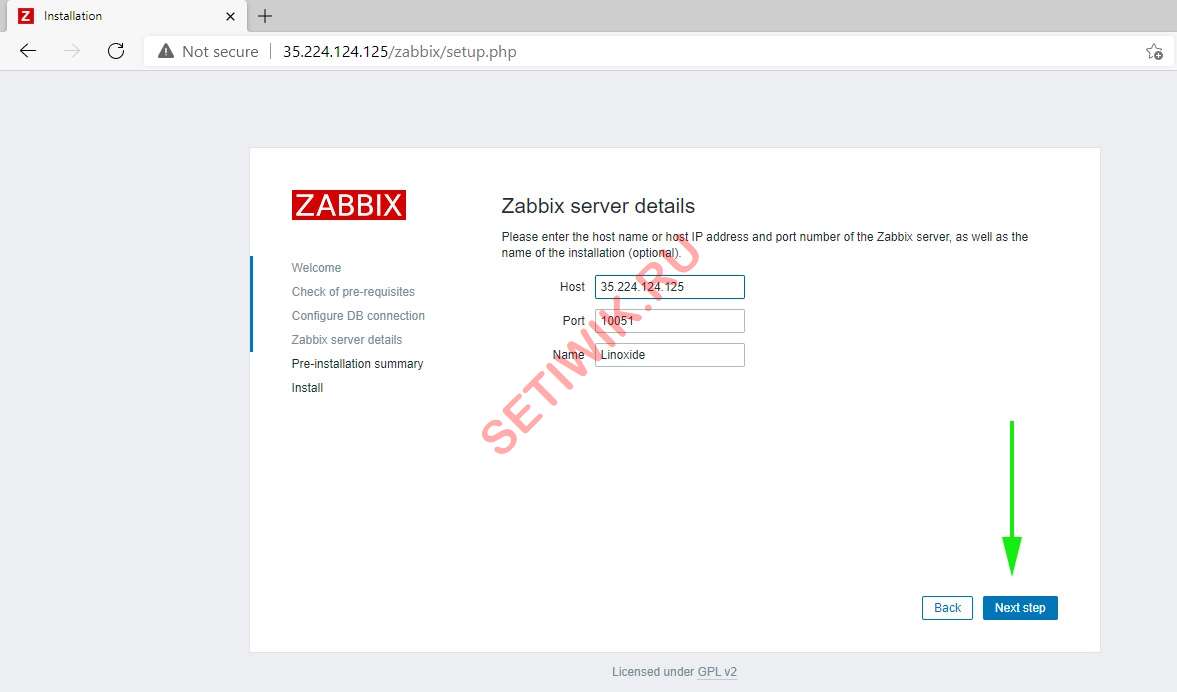
The next step is Zabbix server details. There you can not specify anything, but leave the default parameters. Then there will be a page with verification of the entered data. If everything is in order, then complete the installation. At the end you will see the message: Congratulations! You have successfully installed Zabbix frontend.

After clicking on , you will see the Zabbix server authorization window.
The standard account for logging into the zabbix web interface is as follows:
This completes the installation of the free zabbix monitoring server. You can start setting up.
Configuring Zabbix Server
They are created automatically when you install zabbix. You need to change their owner to a new user. After that, the standard admin can be removed.
Setting up email alerts
I’ll show you on the example of Yandex mailbox settings.
Here you can also test the selected sending method.
That’s it, we’ve set up sending notifications, it remains to wait for the trigger to check. We will do this later, when we connect at least one host to monitoring.
If you need notifications in telegram, then read a separate article on this topic. I also recommend that you read the material on setting up recurring notifications in Zabbix. For many triggers, this can be a very useful feature. For example, you can be reminded every day about the end of the domain delegation time until it is renewed.
Also, zabbix can call via asterisk to notify about events.
Changing the standard alert template
I usually change the default zabbix notification template. It used to be configured in the properties of actions, and now this functionality has moved to the notification methods settings, where we set up sending by email. We go back there and edit the template.
I am making the following changes. I change the template of the subject of the letter in case of a problem and recovery. In the standard template, there is no information about the host name in the subject line of the email. Some templates in triggers include the host name in the trigger name, but there are others that do not. Because of this, the notification does not immediately show which host it is talking about. In my template, the host name will be indicated immediately in the subject, then the status, and then the trigger name.
My appearance seems more obvious to me. The template changes to the following:
It is the same for both problem and recovery.
Changing default monitoring templates
On my monitoring servers, I change some parameters of the standard templates so that there are fewer useless and uninformative responses. This time in Zabbix 5 I wanted to do the same, but didn’t have to.
Installing Zabbix Agent on Linux
If you want to install zabbix-agent on the monitoring server itself, then you don’t need to do anything other than the installation itself. For other systems, you need to connect the zabbix repositories that we used during the server installation. You can see them in the relevant sections for your system.
Installing zabbix agent on Centos:
# dnf install zabbix-agent
Same in Ubuntu/Debian:
# apt install zabbix-agent
To work with a server that is installed locally on the same machine, no more settings need to be made. If you install zabbix agent on another machine, then in the agent configuration file /etc/zabbix/zabbix_agentd.conf you will need to set the following parameters:
srv10 — the name of your monitoring node, which will be specified on the zabbix server. I recommend increasing Timeout for convenience. By default, it is only 3 seconds, and in some checks this is not enough.
Launch the agent and add it to startup:
# systemctl enable —now zabbix-agent
Check the log file /var/log/zabbix/zabbix_agentd.log.
Now let’s try to stop the agent and check if the notification will come to the mail. Go to the console and turn off the agent:
# systemctl stop zabbix-agent
We are waiting for at least 3 minutes. It is this interval that is specified by default for triggering the agent’s unavailability. Before, by the way, it was 5 minutes. After that, we check the main panel, the Issues widget.
Check your email box. There should be a notification from the zabbix server. We pay attention to the subject of the letter, the template of which we have edited. At the very beginning of the topic, the name of the host on which the trigger fired is indicated.
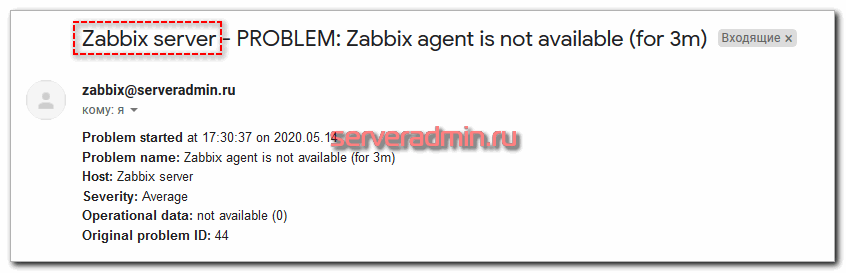
If you use the standard template, this information will not be available.
Installing zabbix agent on Windows
In the latest versions of Zabbix, installing the Windows agent has become much easier, as a ready-made installer has appeared. During its operation, you can immediately specify the address of the monitoring server and the name of the host on which the agent is installed. As a result, everything is done automatically, no need to configure anything manually.
Previously, everything was more complicated, since you had to manually install the service by unpacking the binaries from the archive. Then you also need to edit the configuration file manually. Now with default settings, you do not need to do anything.
To install Zabbix agent on Windows, go to the download page of the official website. We select Zabbix Agent there and download the appropriate version.
At the time of writing, there was no installer for the 5th agent yet, but it will probably appear in the near future. I’ll show you the example of agent 4.4, which is fully compatible with a more recent server. We run the msi package and reach the stage where you need to specify the server address and host name. Let’s do it.
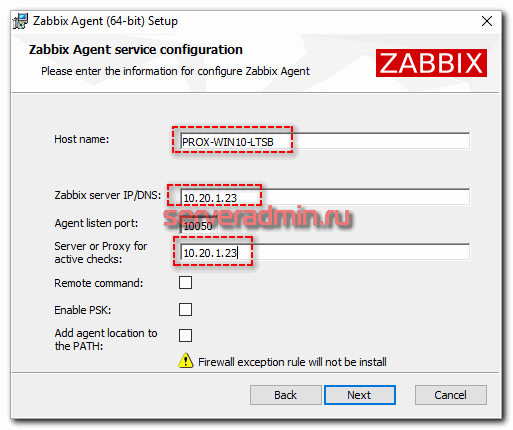
Leave everything else unchanged.
Do not forget to create an allow rule in the Firewall, if you have it enabled. To do this, go to Control PanelSystem and SecurityWindows Firewall — Advanced Settings — Inbound Rule — Create Rule.
On the first tab, specify the host name, the same as on the client, add it to any existing group and set the ip address of the computer.
Go to the Templates tab and select the Template OS Windows by Zabbix agent template there.
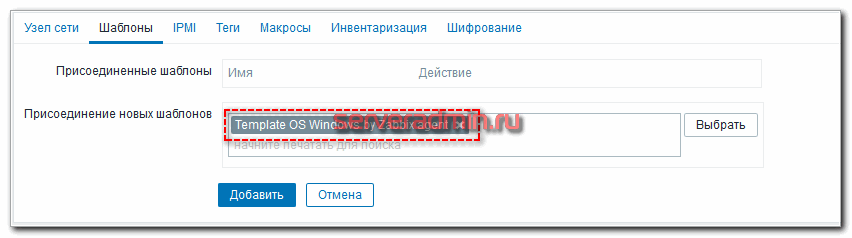
Adding a new host to the monitoring server. It remains to wait a few minutes for the receipt of fresh data. You can check them where before, in Latest data, by selecting a new host.
This completes the installation and configuration of windows monitoring using the zabbix agent. You can add new computers with different versions of windows. The same version of the agent is suitable for everyone, both desktop and server systems.
Encrypted Connection Setting
Add the following parameters to the zabbix_agent.conf configuration.
In the properties of the host on the zabbix server in a separate Encryption tab, configure the PSK key.
I draw your attention to a common error that I regularly encounter, and then for a long time I can’t understand what the problem of an encrypted connection is. Why is nothing working. Sometimes I forget to set PSK in the Host connections line, because I automatically check the PSK checkbox in Host connections. PSK must be specified both there and there.
If everything is done correctly, then in the information about the host on the monitoring server there will be a note that the connection with the agent is encrypted.

https://youtube.com/watch?v=ZrPloyMAJOk%3Ffeature%3Doembed
This completes the installation and basic configuration of the zabbix 5.0 monitoring server. Tips, comments, corrections, please leave in the comments. The material turned out to be voluminous and informative. I could have made a mistake somewhere.
The Zabbix team is closely monitoring the backward compatibility of their products. Thanks to this, the transition to new versions is mostly painless. There is no need to urgently reconfigure or correct old developments. In new versions, functionality is only added, the old one most often does not undergo changes, it can continue to be used. There are, of course, exceptions, but rarely.
Materials on setting up monitoring of various systems and services do not become outdated and remain relevant for the newest releases. Here is an example of monitoring various services and services listed on my site. Perhaps some of this will be interesting and useful to you.
Monitoring in Zabbix:
See other materials on monitoring with Zabbix in a separate section.
If you have a desire to learn how to administer Linux-based systems, but you have never worked with them and are not familiar with them, then I recommend starting with the Linux for Beginners online course at OTUS. Course for beginners, for those who are not familiar with Linux. The price for the course is minimal (symbolic). Course and price information.
Did the article help? Subscribe to the author’s telegram channel
Announcements of all articles, plus a lot of other useful and interesting information that does not make it to the site.
On October 1st, 2018, a new version of the free monitoring system was released, which I use all the time. I will talk in detail about the installation and initial configuration of Zabbix 4.0 using the example of CentOS, Debian, Ubuntu systems with screenshots and explanations. There are a lot of interesting and useful innovations in this version, so it’s definitely worth a look.
